Bulk user template lets you create multiple Tango users at once by filling the spreadsheet template. Each row becomes a user; the columns specify name, email, role, and whether the user has organization-wide access or access only to selected groups and accounts. See Roles and permissions in Tango.
You can also include optional custom fields, such as department, cost center, region, or team, so user information stays consistent for reporting.
Complete and submit the bulk user template
Use the Bulk User Management Template to enter the details Tango needs to create each user. Add one row per user, confirm each user's role and access, and then send the completed file to Tango using the secure method your Customer Success team confirms.
To fill out your bulk user template:
-
Download the Bulk User Management Template.
-
Open the file in a spreadsheet tool such as Excel.
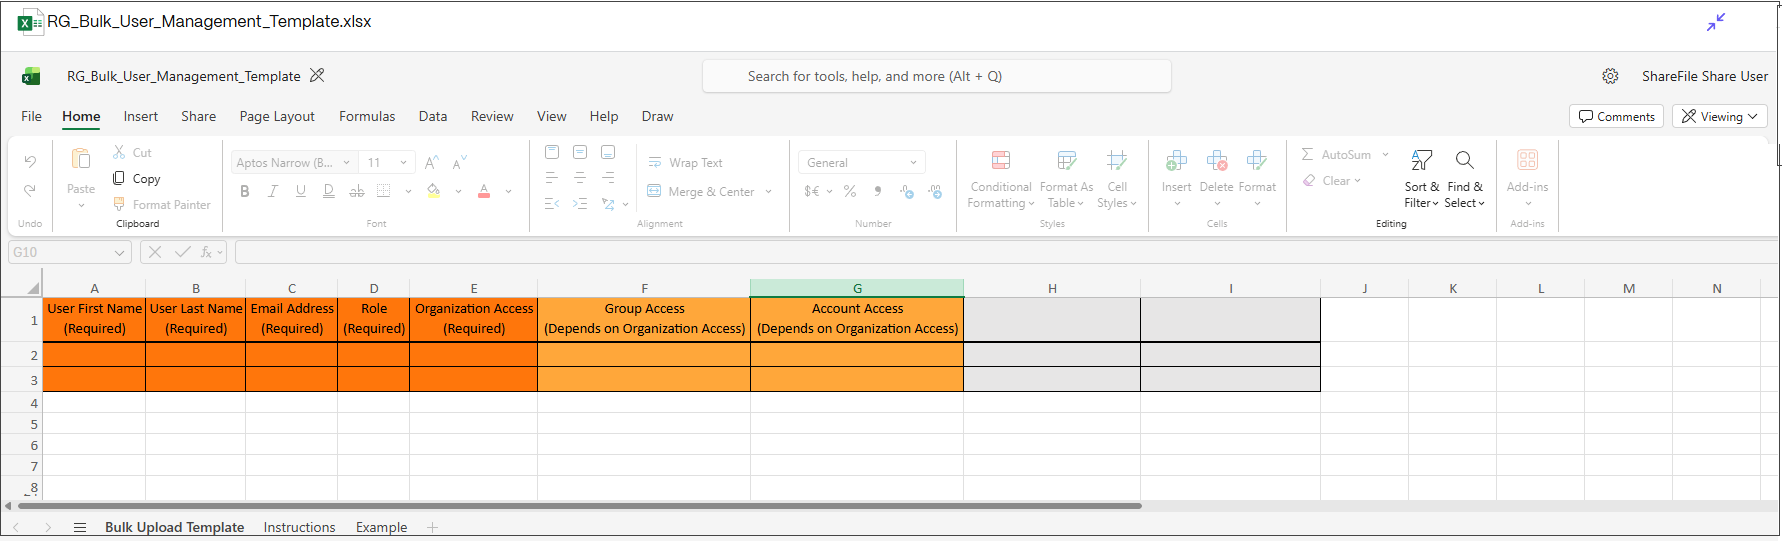
-
Complete the required fields:
|
Field
|
Required?
|
What to enter
|
|---|
|
User First Name
|
Yes
|
The user's first name.
|
|
User Last Name
|
Yes
|
The user's last name.
|
|
Email Address
|
Yes
|
The email address the user uses to sign in to Tango. Each user must have a unique email address.
|
|
Role
|
Yes
|
Enter a default role: Admin, Standard, Support Lead, Support, or Sender. For a custom role, enter the role name exactly as it appears in Tango, including capitalization.
|
|
Organization Access
|
Yes
|
Enter YES to grant the user organization-wide access. Enter NO to restrict access to specific groups, accounts, or both. If you enter NO, complete Group Access, Account Access, or both.
|
|
Group Access
|
Required when there’s no organization access and the user needs group access
|
Enter one or more Group IDs, separated by commas. Leave blank if the user has organization access or only needs account access. See Find your Tango account number.
|
|
Account Access
|
Required when there’s no organization access and the user needs account access
|
Enter one or more Account numbers, separated by commas. Leave blank if the user has organization access or only needs group access. See Find your Tango account number.
|
-
Add optional fields, such as Department, Cost Center, Region, or Team.
Note:
-
To add custom metadata, enter a header in the first row of each blank column and each user's value in the matching row. You can add up to 15 custom columns.
-
Use the same metadata columns in each bulk upload to keep reporting consistent.
-
Review roles and permissions. Before you submit the file, confirm that each user's role gives them the right level of access. Use Roles and permissions in Tango to compare default roles and permissions.
-
Submit your completed file.
After you complete the template, contact the Customer Success team at success@tangocard.com to confirm the secure way to share the file. Do not email the completed spreadsheet unless the Customer Support team specifically tells you to.
After Tango processes the file, new users receive an invitation email from noreply@tangocard.com. Users who have not accepted their invitation appear with an Invited status, and invites expire after seven days. See Reissue an expired Tango invite.
More resources