This supplementary document is to help you set up SSO for Tango portal with your Okta Identity Provider (IdP). You must first configure your IdP as an admin to create an entry for Tango portal Single Sign-On (SSO). Consult with your company’s IdP expert for the latest IdP configuration steps and instructions.
Note: This document is created in August 2024. We’re only providing a general guidance to get you started. For up-to-date procedure and screenshots, refer to the your IdP documentation.
Disclaimer: Tango has no affiliation with Okta. Tango makes no warranty of any kind, whether express or implied, with regard to any third party products, third party content, or third party services. Tango will not be liable for loss damage, cost or expense, whatsoever resulting from this guide. This guide is provided as a courtesy. To confirm accuracy or completeness of this guide, please consult with Okta directly.
Follow our procedure below:
To set up SSO with Okta OIDC for the Tango platform, you need an administrator account access to your IdP provider. Log in to your IdP and create and entry for the new SSO. Find out Connection display name, Client ID, and OpenID Connection ID Token Issuer URL in your IdP before continuing in Tango portal.
To set up Okta OIDC:
-
Log in to your Okta IdP with an admin account.
-
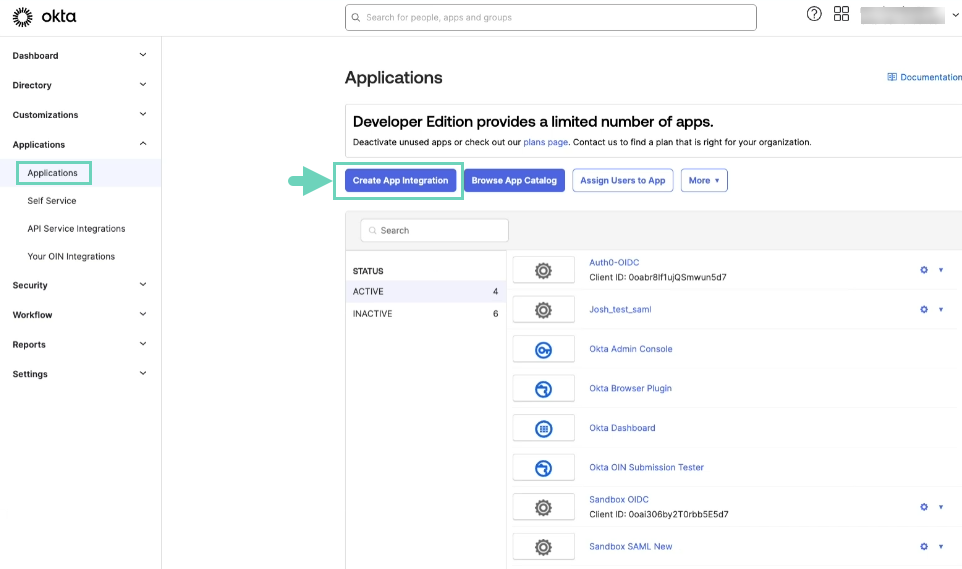
Go to Applications and click Create App Integration.
-
Select OIDC OpenID Connect and Web Application.

-
Click Next.
-
Under General tab > General Settings:
-
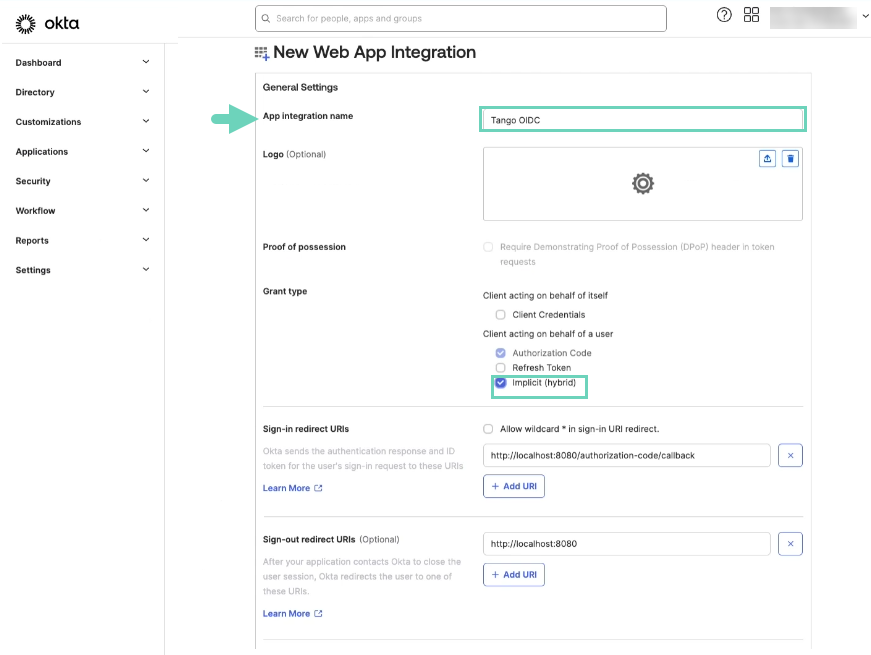
Enter a name in the App integration name field, such as “Tango OIDC”. You can use this name as Connection display name in Tango.
-
Select Implicit (Hybrid) for Grant type.
-
For Controlled access, select everyone in your organization or limit users.
-
Click Save.
-
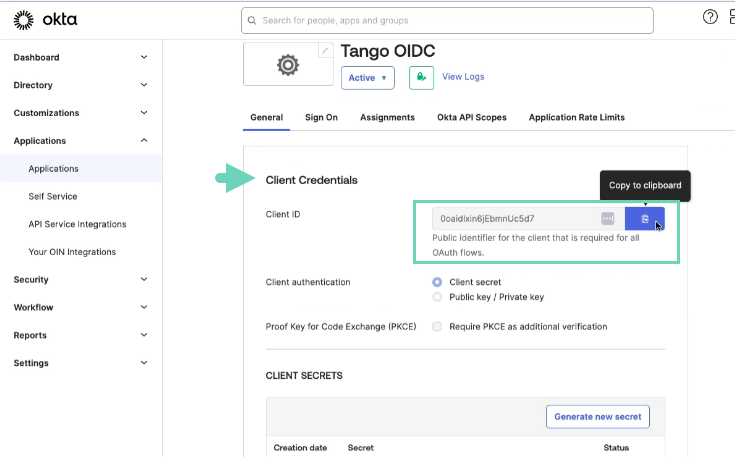
Under General tab > Client Credentials:
Click to copy the Client ID value. You need it later to Add SSO connection in Tango portal.
-
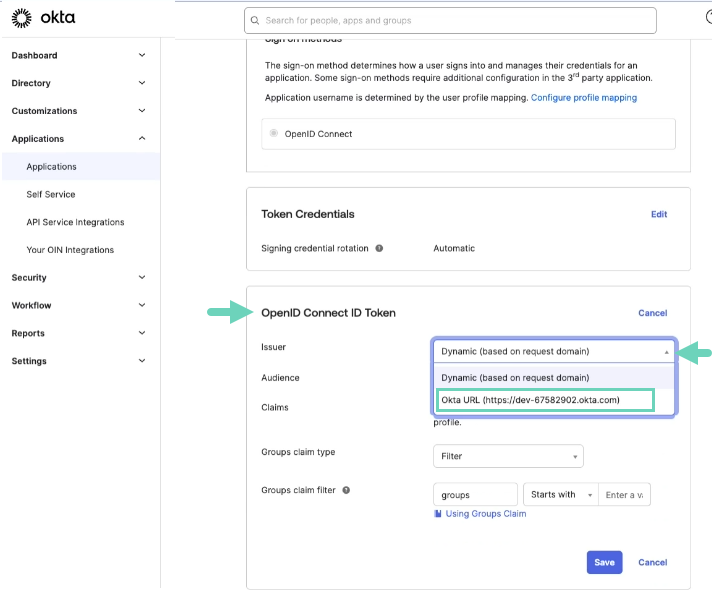
Under Sign On tab:
-
Click the drop-down menu next to Issuer and select the Okta URL link. You need to enter this link later in the OpenID Connection ID Token Issuer URL field when configuring Tango portal. The URL link will be automatically appended with the following extension as soon as you paste it in Tango portal: (/.well-known/openid-configuration). See how to Add SSO connection in Tango portal.
-
Click Save.
-
Click Edit next to General settings > Login:
-
For Sign-in redirect URIs, paste one of the following links based on your environment:
-
Click Save.
-
Follow the remaining steps in Tango portal. See how to Add SSO connection in Tango portal.
To set up SSO with Okta SAML for the Tango platform, you need an administrator account access to your IdP provider. Log in to your IdP and create and entry for the new SSO. Find out Connection display name, Entity ID, and Metadata URL in your IdP before continuing in Tango portal.
To set up Okta SAML SSO:
-
Log in to Okta IdP with an admin account.
-
Go to Applications > Create App Integration.
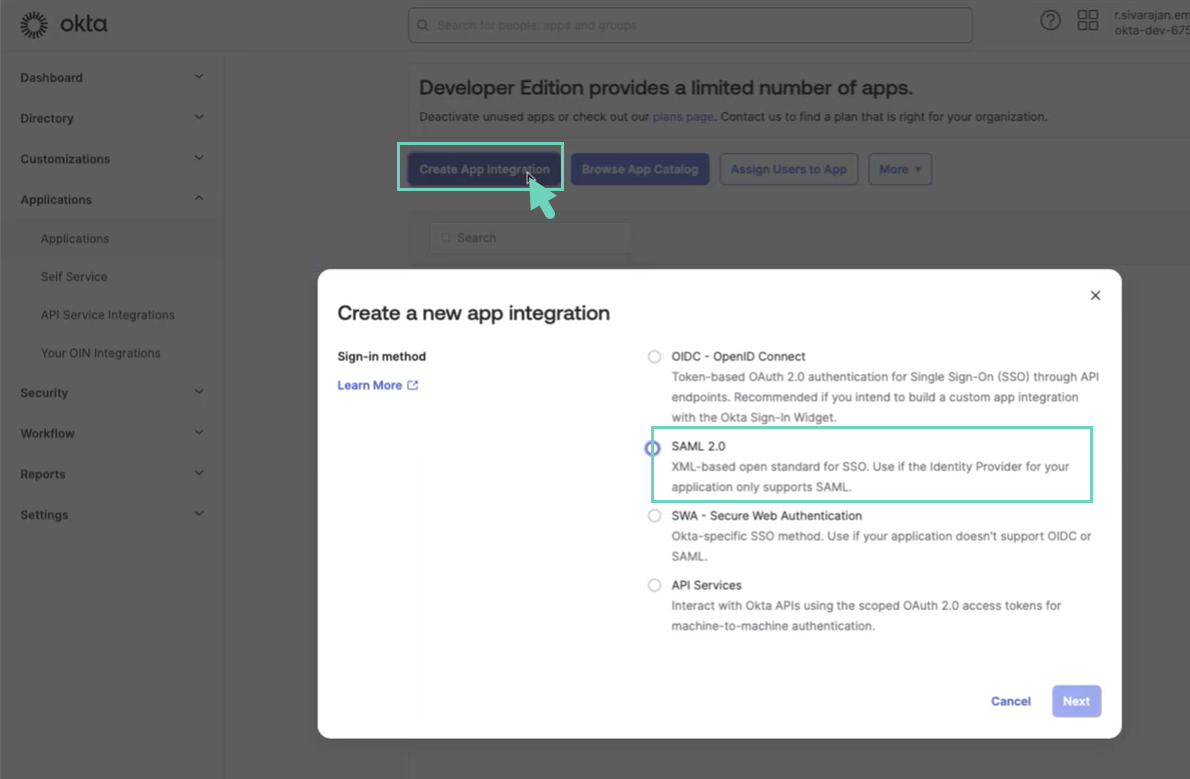
-
Select SAML 2.0 and click Next.
-
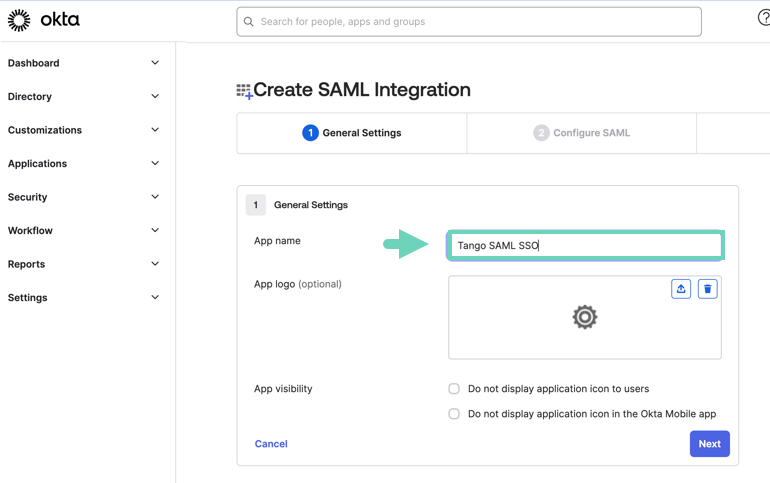
Under General tab > General Settings:
Enter a value for the App name, such as “Tango SAML SSO”, and click Next.
-
For Single sign-on URL, paste one of the following links based on your environment (sandbox or production). This link is also accessible through Tango portal’s Team settings > Authentication > SAML connection.
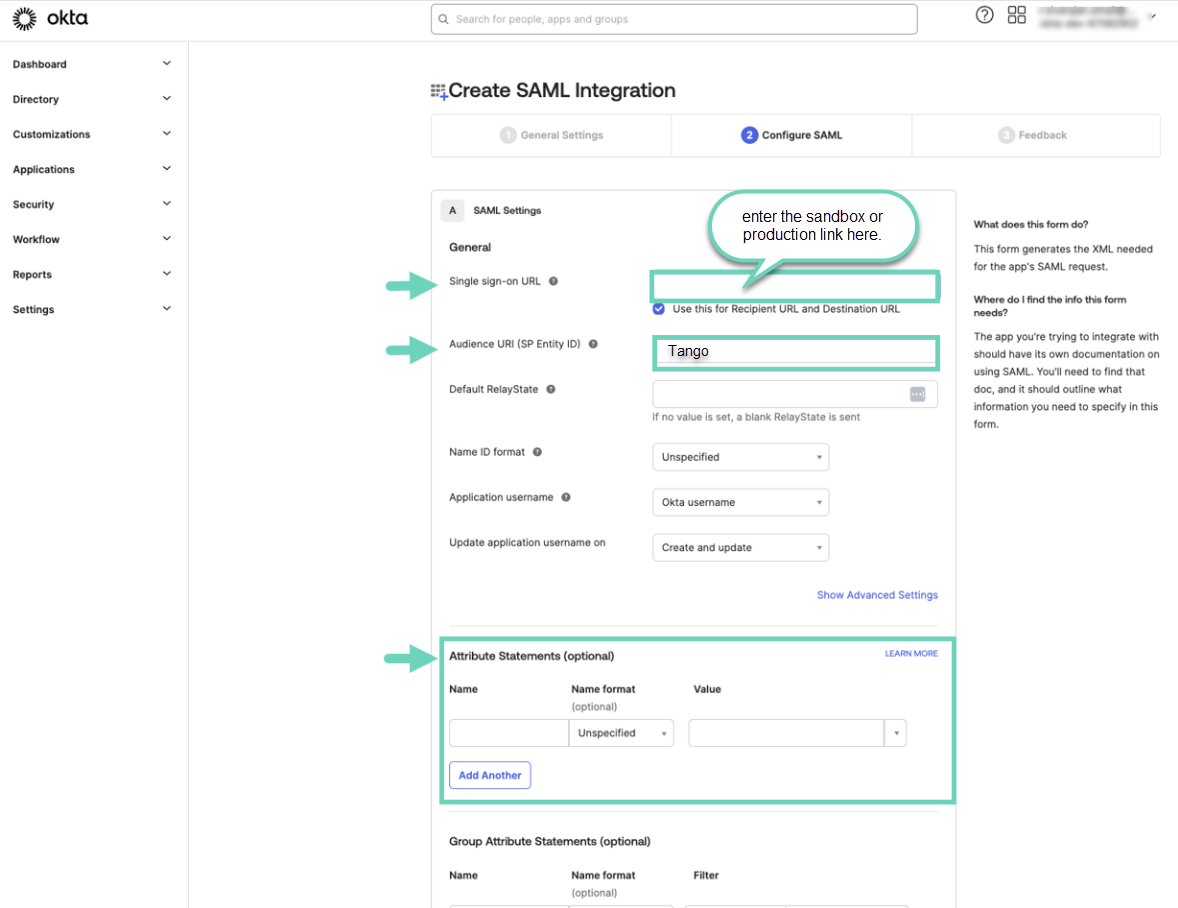
- Enter "Tango" in the Audience URI (SP Entity ID) box. This name will also be used in Tango portal configuration under SAML > Entity ID.
-
Create attributes by copying the following values from Tango portal and pasting them here in your IdP under Attribute Statements. See how to Add SSO connection in Tango portal:
|
|
|
|---|
|
given_name
|
user.firstName
|
|
family_name
|
user.lastName
|
|
email
|
user.email
|
|
username
|
user.login
|
|
email_verified
|
true
|
*For other IdPs, refer to the IdP documentation to find out their attribute names. -
Click Next and then Finish.
-
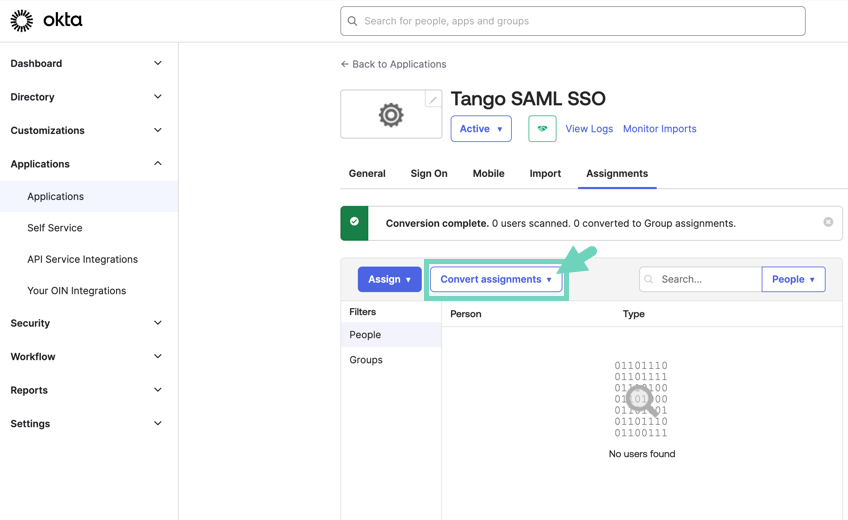
Click the newly created application:
-
Under the Assignments tab, click Convert Assignments > Convert all assignments from the drop-down menu.
-
Select Groups or People to assign to this new SAML SSO connection, and click Done.
-
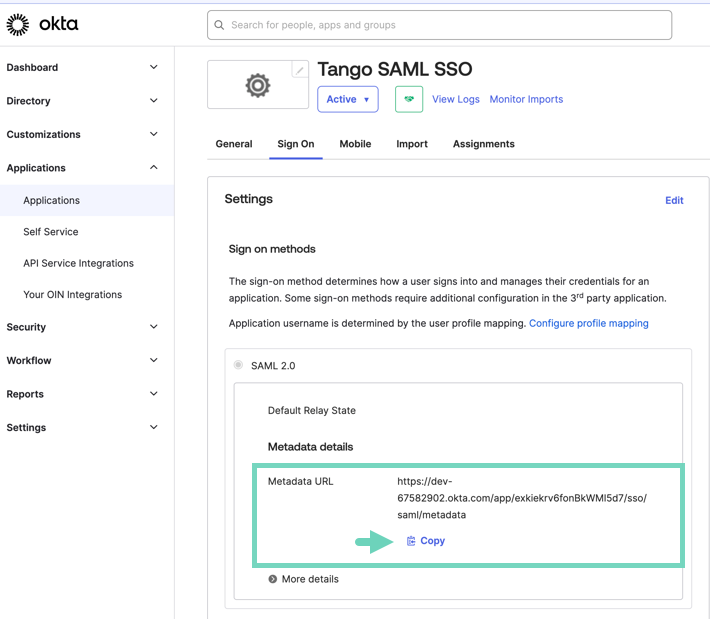
Click Sign On.
-
Click Copy next to Metadata URL here and paste the link in SAML > Matadata URL in Tango portal. See how to Add SSO connection in Tango portal.
-
Continue the SSO configuration in Tango Portal. See Add SSO connection in Tango portal.
Add a tile in Okta for OIDC SSO connection
You can add a tile for the newly created Tango OIDC SSO connection to your Okta dashboard. To start, make sure you have enabled the SSO in Tango portal. Log in to your Okta IdP and follow the instructions below:
To add Tango SSO tile:
-
Log in to Okta IdP using your admin account
-
Select your Tango application OIDC on the list.
-
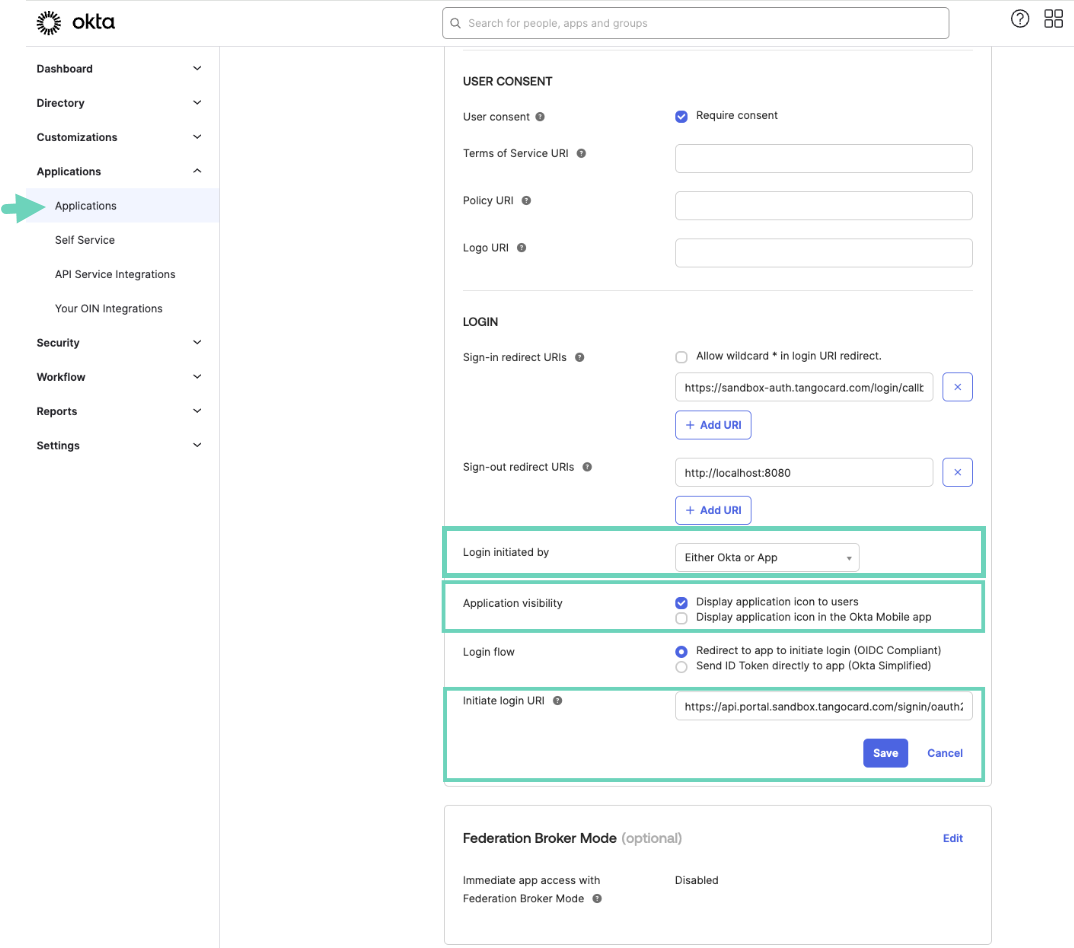
Go to Applications > General Settings and click Edit.
-
Enter a value for App integration name such as “Tango OIDC”.
-
Select Login initiated by > Either Okta or App.
-
Select Application visibility >Display application icon to users.
-
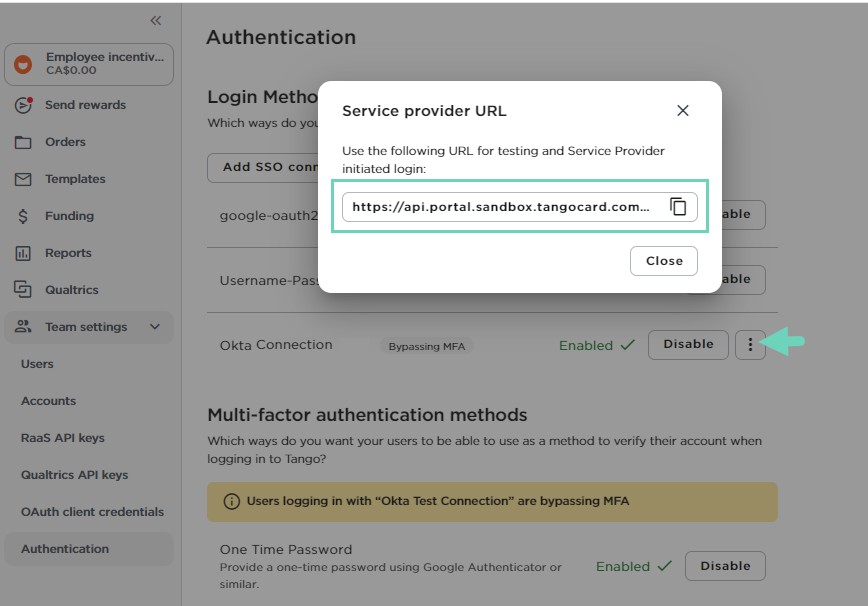
Under Initiate login URI, copy and paste the same link you have found under “Service provider URL” in Tango portal.
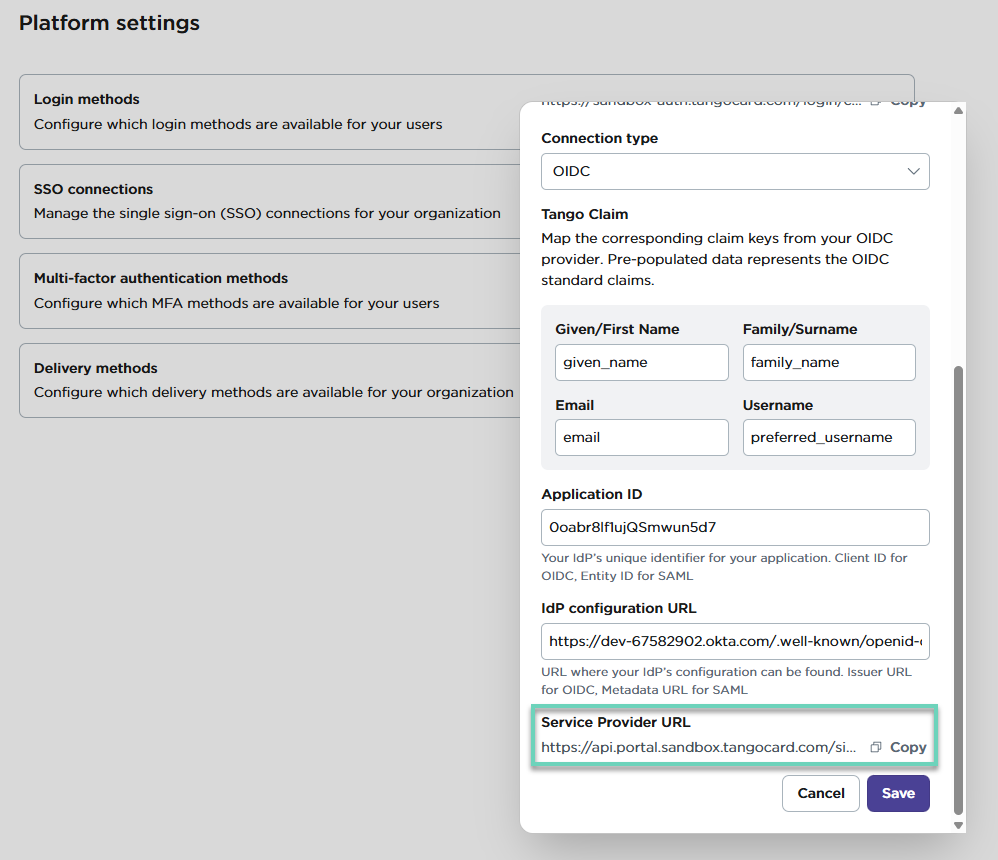
To copy the Service provider URL:
-
Sign in to the Tango portal.
-
Go to Platform settings > SSO connections.
-
Click your newly added SSO.
-
Scroll down to copy the Service provider URL and click Save. See full instructions in Add SSO connection in Tango portal.
- Click Edit next to Federation Broker Mode and Disable it.
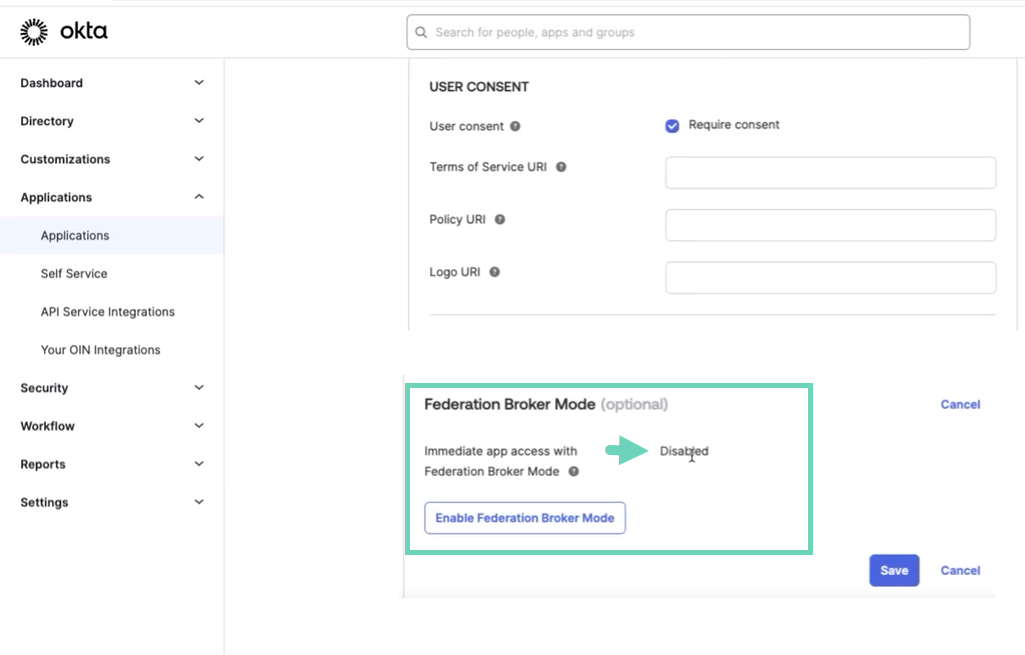
-
Click Save.
-
Click Edit Logo and upload Tango logo measuring 420 x 120 pixels.

-
Click Save.
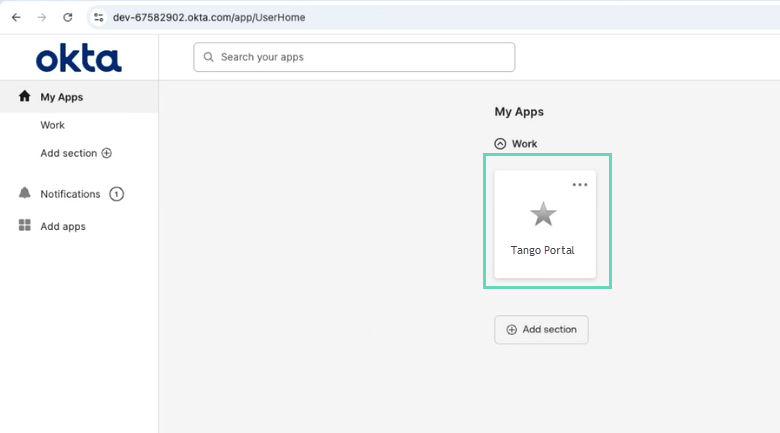
Refresh your Okta dashboard under My Apps and see the newly created “Tango” tile. To test, click the tile to log you in to the Tango portal.
Add a tile in Okta for SAML SSO connection
You can add a tile for the newly created Tango SSO connection on your Okta dashboard. To start, make sure you have the administrator rights and have enabled SSO in Tango portal. Log in to your Okta IdP and follow the instructions below:
To add Tango SSO tile:
-
Log in to Okta using your admin account.
-
Click Okta apps > My end user dashboard on top of the page.
-
Inside the dashboard, click Add apps on the left menu.
-
Type and search for “Tango” in the Search box. Tango cannot be found but in the search screen that appears, click Add a bookmark instead.
-
For App URL, copy the Service provider URL and click Save.
To copy the Service provider URL:
- Sign in to the Tango portal.
-
Go to Platform settings > SSO connections.
-
Click your newly added SSO.
-
Copy Service provider URL and click Save. See full instructions in Add SSO connection in Tango portal.
-
Enter an App name such as “Tango portal”.
-
Click Save.
Refresh your Okta dashboard under My Apps and see the newly created “Tango portal” tile. To test, click the tile to log you in to Tango portal.
More resources

