Depending on your company policy and setup, you may choose to have one or more login methods including username/password, Google account, or multiple SSOs (OIDCs and SAMLs). When your SSO is fully configured and ready to use, we recommend you to disable any other login method that your organization does not use, such as username/password or google authentication. See Manage login methods in Tango portal for more information.
Who’s this guide for?
This guide is for Tango platform administrators with Entire organization access and Platform settings permission to configure SSO as a secure login method for the Tango portal.
Note:
Tango doesn’t provide IdP consultation. If your organization is small, or you cannot set up IdP, consider Tango platform’s default (the username/password or Google SSO).
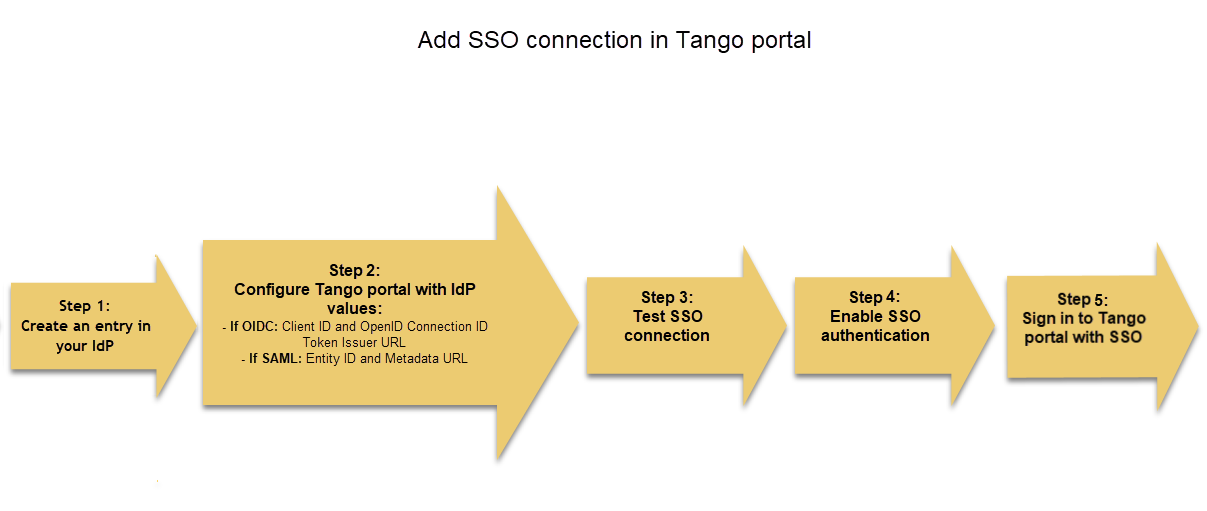
How to add SSO connection in Tango portal?
Follow the steps in this guide to add OIDC or SAML SSO to your Tango portal, but before you begin, make sure you configure your IdP first to create an entry. See the instructions below:
You must have Entire organization access and Platform settings permission to be able to access platform settings and manage SSO for your organization. See Roles and permissions in Tango. Once the SSO entry has been created in your IdP, copy the required values in IdP for Tango portal configuration.
Note:
The following table provides guidance for the most popular IdPs. If you’re using an IdP other than Okta, Azure, or OneLogin, you’re required to contact your Customer Success Manager (CSM) or success@tangocard.comto add your IdP domain to Tango's Content Security Policy (CSP).
Log in as an admin to your IdP provider and follow their instructions and create an entry. We have provided some examples below but we recommend you to always check with your IdP documentation for the latest.
You must have Entire organization access and Platform settings permission to be able to access platform settings and manage SSO for your organization. See Roles and permissions in Tango. Once the SSO entry has been created in your IdP, copy the required values in IdP for Tango portal configuration.
Once the SSO entry has been created in your IdP, copy the required values in IdP for Tango portal configuration.
To configure Tango portal:
- Sign in to the Tango portal.
- Go to Platform settings > SSO connections.
- Click Add connection to configure SSO details:
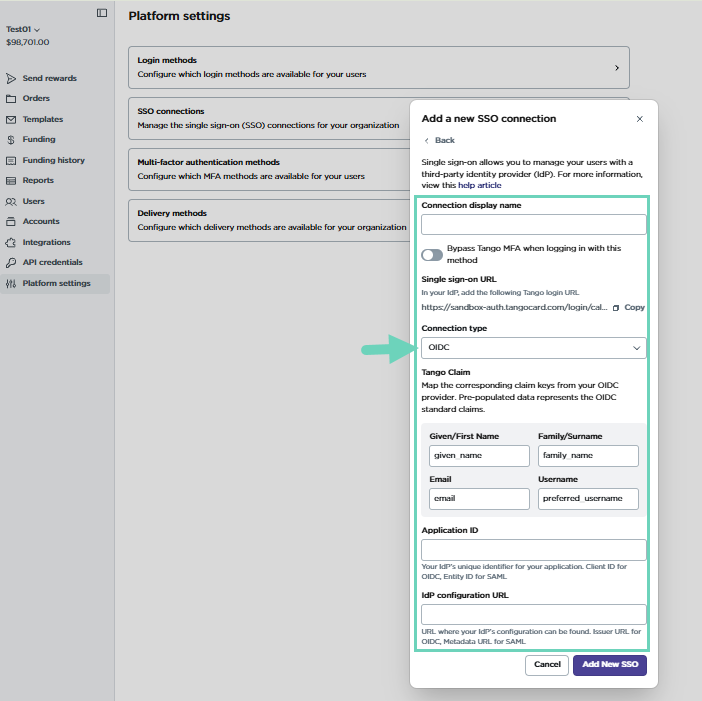
- Connection display name: Add the connection display name which shows up later on the Tango login page as a login method for users.
Note:
- You cannot have duplicate names.
- The connection display name may have up to 128 letters with no special characters.
- Bypass MFA: (Optional) Select when you bypass multi-factor authentication (MFA), you won’t be challenged for an MFA when using SSO.
-
Single Sign-On URL: This is the URL used for OIDC or SAML authentication. Depending on the environment, the following URL should be used:
-
Connection type: Select the protocol used for SSO: OIDC or SAML.
-
Tango Claim: In your IdP, map the following Tango fields to the equivalent OICD or SAML attributes. Tango claim keys are automatically populated for standard OIDC:
-
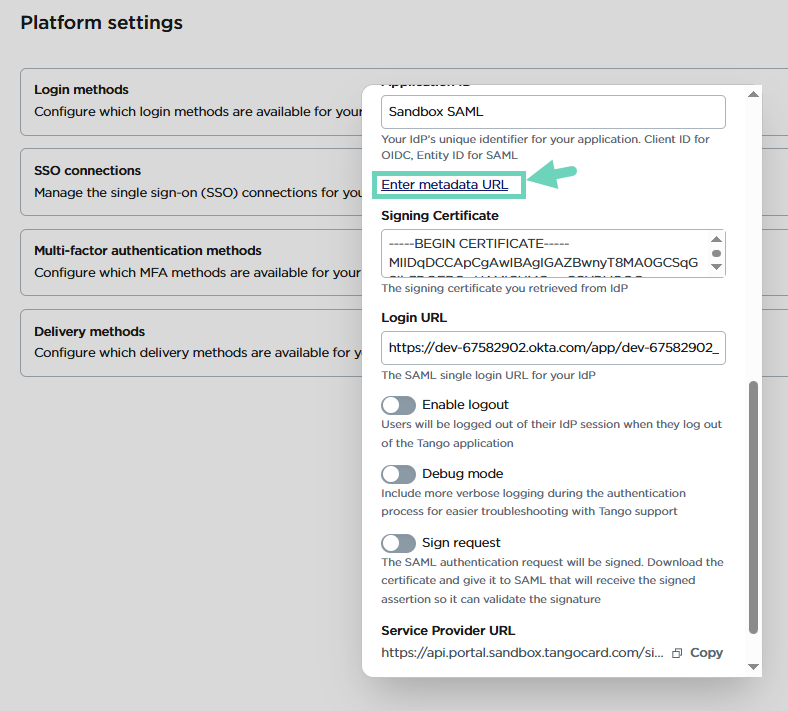
Application ID: Enter the unique ID that you have configured in your IdP. Application ID is the same as “Client ID” for OIDC and “Entity ID” for SAML. See our SSO configuration steps in IdP guide.
-
IdP Configuration URL: Provide the URL for the identity provider's configuration. The IdP configuration URL is the same as “Issuer URL” for OIDC and “Metadata URL” for SAML. See our SSO configuration steps in IdP guide.
-
(SAML, optional) Click Enter metadata URL.
-
Click Enter details manually to enter SAML configurations such as Signing certificate, Log in URL, Enable logout, Debug mode, and Sign request.
- Click Add New SSO to create the connection. The connection is disabled by default. You must test and enable it to make it available for your portal users. See how to test and enable SSO connection.
Note:
- For SAML SSO, make sure that your IdP signing certificate is up-to-date. When the signing certificate expires, you must download the certificate and give it to SAML. It will receive the signed assertion and validate the signature. This procedure ensures the SSO connection continues to work.
- Tango does not require signing certificate. If you like to disable it, you must edit your SAML SSO connection. See how to Disable Sign Request for SAML SSO.
As a Tango portal admin, you should test your SSO connection before enabling it for other users. To test the SSO connection, change it to the testing mode. When the test is successful, enable the connection to make the SSO available for all users on the Tango portal.
Note:
- Admins and users with the Entire organization access and Platform settings permission, can see all SSO connections listed under “SSO connections” including the connections that are in testing mode.
- An SSO connection can only be tested by the authorized users who have access to the test URL.
- Non-admin users cannot log in with the SSO method that’s still in the testing mode.
- The Tango portal default connections cannot be edited or deleted in your portal, but can be disabled.
To test the SSO connection:
- Make sure you are Signed in to the Tango portal with the right permissions.
- Go to Platform settings > SSO connections.
- Find your SSO on the list then click to open configuration.
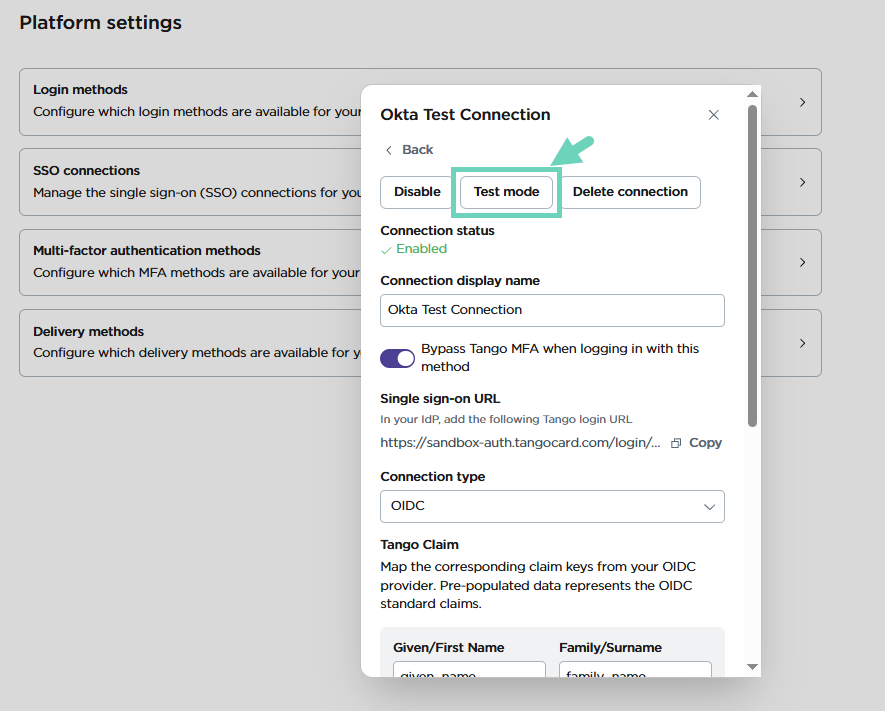
- Click Test mode. The label changes on the Tango portal to Testing.
- Click copy :copy: Service provider URL.
- Click Save and log out of the Tango portal.
- Paste the copied URL in an incognito browser and hit Enter to log in again. You know the test is successful if you can log in to the Tango portal dashboard directly and without entering your password. The UI indicates that the SSO is in Testing mode.
Note:
- Other Tango portal users cannot see this SSO as an option in their login page while the connection is being tested.
- To see the new SSO in Tango portal, log off and log back in. The SSO is added to the login methods.
To copy the testing URL anytime after, click Service provider URL for the SSO connection. After completing the test, use the Service Provider (SP) URL for SP-initiated logins such as Okta. It will allow users to bypass the Tango login page and access the Tango application directly.
You must enable your SSO to make it available for all users in your portal. Enable the authentication after your test confirms the connection is working.
To enable SSO authentication:
- Make sure you are signed in to the Tango portal with the right permissions.
- Go to Platform settings > SSO connections.
- Find your “Testing” SSO on the list then click to open configuration.
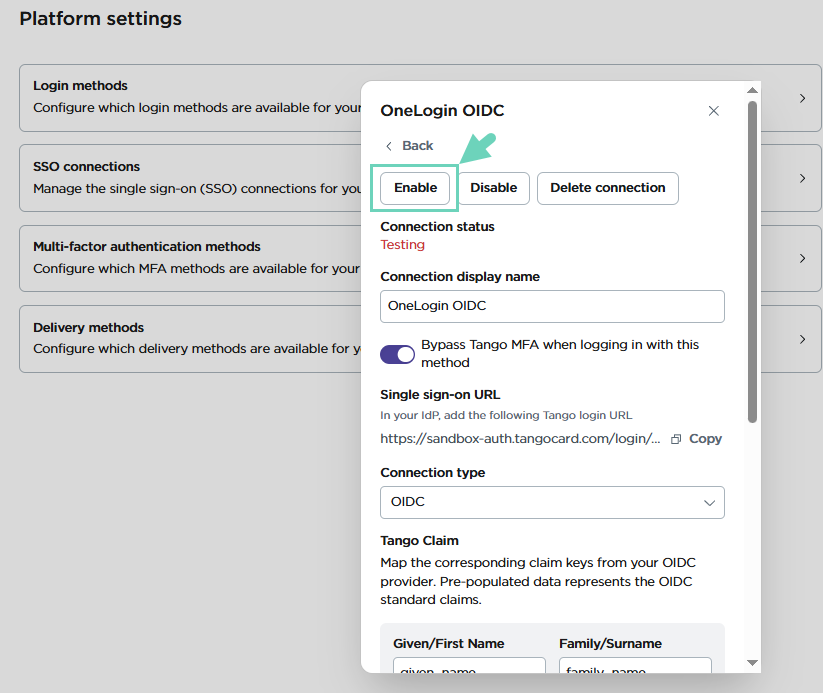
- Click Enable next to the connection.
The newly added SSO shows up as a login method under your “Platform settings” and your Tango login page. At this point you and all users can sign in to Tango portal using SSO.
Best practices:
For extra security and to avoid users confusion, we recommend you to keep only one active login method at any time and disable the rest. For example, disable username/password and google authentication when you have enabled SSO.
Once the SSO authentication is enabled, you can sign in to Tango portal using the SSO.
Note:
- If you've logged in using SSO before, you may not see all the steps below.
- If you’ve logged in to SSO before you cannot reset your password via Tango portal.
To sign in with SSO:
- Go to the Tango portal.
- Enter your email address and click Continue.
You can select the Remember email option.
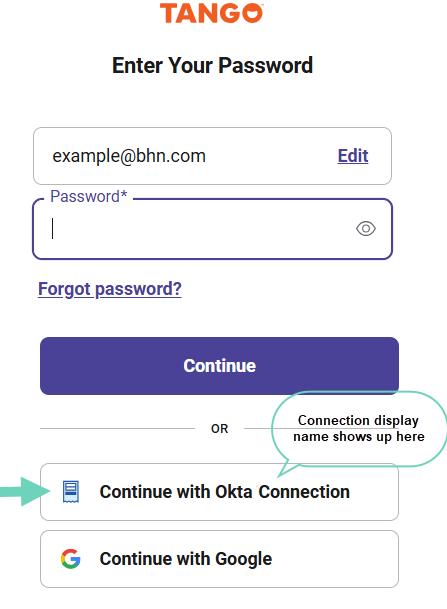
- Select Continue with [your] SSO Connection to log in.
If prompted, enter your email address and click Continue. If your IdP prompts you to sign in, enter your credentials to log in to your IdP, and you will be redirected back to Tango. Receive a text message, email, or authenticator app with your six-digit verification code. Enter your six-digit code and click Verify. For more information see Sign in to Tango portal.
Note:
You will receive the verification code only if:
- This is your first time logging in on this device.
- You have not checked the option to remember this device for 30 days last time you logged in.
- You have logged in to this device before, but cleared cache/cookies since the last time you used Tango portal.
More resources

