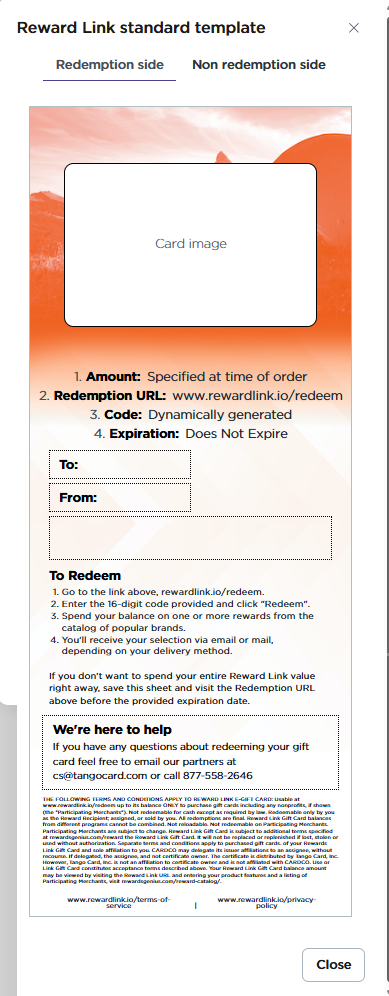
Tango’s Printed Reward Link template refers to a pre-designed customizable layout used to create physical reward letters that are mailed directly to your recipients. These templates are used for Tango Printed Reward Link(s) and are the perfect way to boost your brand and leave a lasting impression. Every Tango platform includes a pre-configured template called Reward Link standard template with template ID (P000000) for immediate use:
Use the standard template or create custom templates for your platform. Create custom Printed Reward Link templates once and reuse them without starting from scratch. You can create unlimited custom Printed Reward Link templates. Personalize your printed Reward Link template by adding your company logo, a custom card image, and a tailored message.
Note:
You cannot set a Printed Reward Link template as the default for your platform, account, or group. See About Printed Reward Link.
Permissions
-
To be able to create and configure physical templates, you need Manage permissions on Delivery templates.
-
To view and use existing templates such as when placing orders, you need View permissions.
Create a Printed Reward Link template
Follow the instructions below for the redemption side (front) with the reward, and the non-redemption side (back) without the reward.
To create a printed Reward Link templae:
-
Sign in to the Tango portal.
-
Click Templates on the left menu.
-
Select Printed reward link from the drop-down menu.
-
Click Create physical template on the top right.

-
On the redemption side tab, enter the fields below. As you make changes, a live preview appears on the right:
|
Header
|
Purpose
|
Required/optional
|
|---|
|
Template name
|
Enter a meaningful name for your template.
|
Required
|
| To name |
Enter the reward recipient's name using a generic term or the actual name. Limit to 70 characters.
This field can be overridden when placing orders via individual or bulk upload. See Send bulk digital and printed rewards with Tango.
|
Optional
|
| From name |
Enter the sender's name to notify the recipient who the reward is from. Limit to 70 characters.
This field can be overridden when placing orders via individual or bulk upload. See Send bulk digital and printed rewards with Tango.
|
Optional
|
| Message |
Enter a brief reward message for your recipient. Limit to 150 characters.
This field can be overridden when placing orders via individual or bulk upload. See Send bulk digital and printed rewards with Tango.
|
Optional
|
| Customer support message |
Select the checkbox to Include Tango's Customer Support contact information. if you want Tango to support your recipients.
If you do not use Tango’s support, clear the checkbox. You assume first-tier support responsibility by entering your customer support information. Limit to 160 characters.
|
Required
|
-
Click Save.
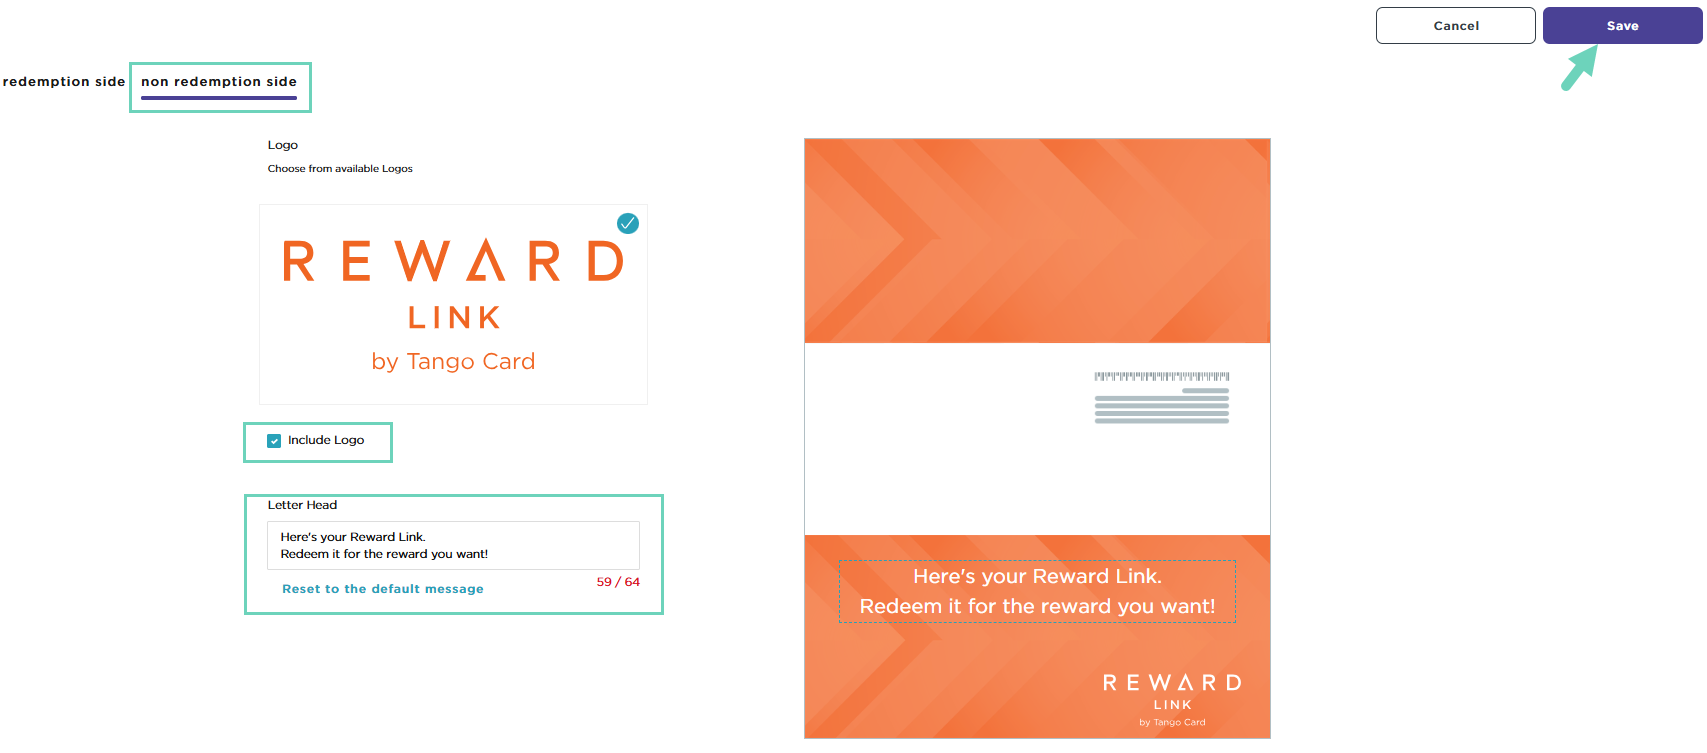
To customize the logo and letterhead, go to the non redemption page, which is the back of the physical letter and excludes the reward.
-
Select the Include Logo checkbox for your organization’s logo to appear on the back of your letter. (Optional)
-
Enter a text for your Letter Head.
-
Review the Printed Reward Link template and click Save.
The printed email template is saved under Physical templates with a new ID, Pxxxxxx.
Manage Printed Reward Link templates
For more on managing and customizing templates:
More resources

