Tango’s digital template includes pre-designed layouts for email and text messages, allowing users to create and send communications quickly without starting from scratch each time. To make things even easier, every Tango platform comes with a pre-configured digital template called Tango Card Standard Template (ETID E000000) for immediate use.
You can use the standard digital template as-is, or create custom digital templates tailored to your platform, group, or account.
Note:
A digital template is identified by one ETID that bundles both an email layout and a text (SMS) layout together. Email and text are not separate templates—they are two delivery channels within the same digital template. Because of this, the creation workflow requires you to complete the Setup, Email, and Text steps sequentially.
Permissions
-
To be able to create and configure digital templates, you need Manage permissions on Delivery templates.
-
To view and use existing templates such as when placing orders, you need View permissions.
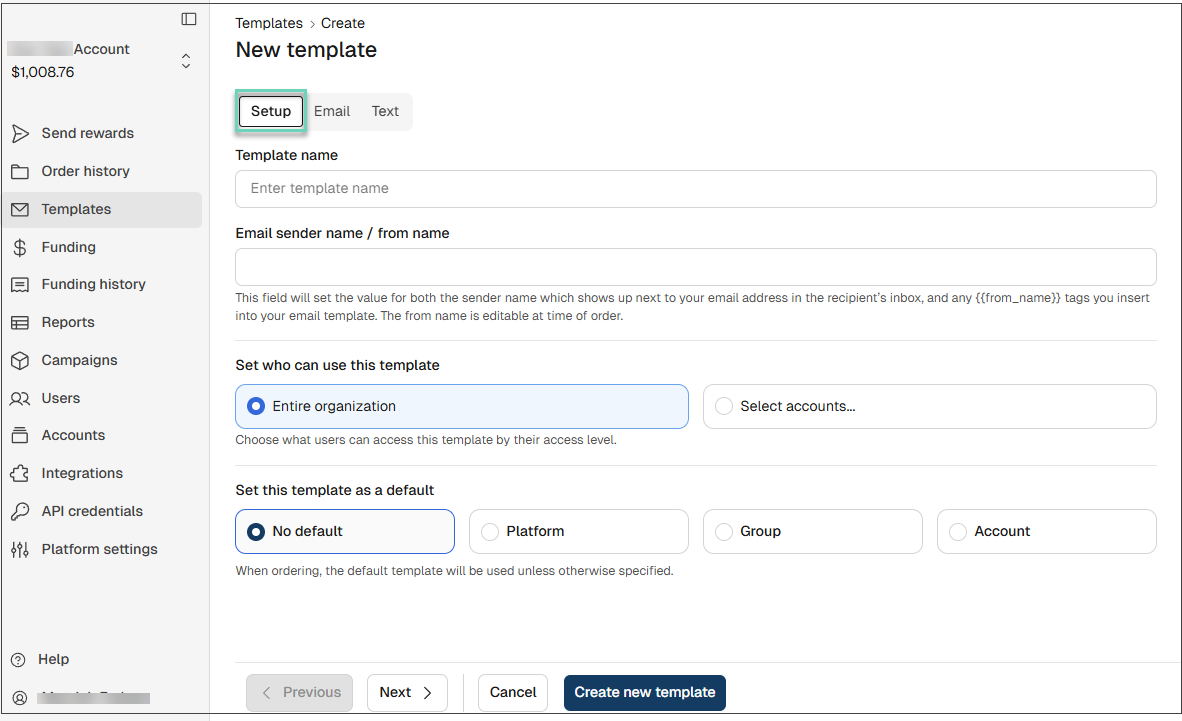
Create a digital template: Setup and Email
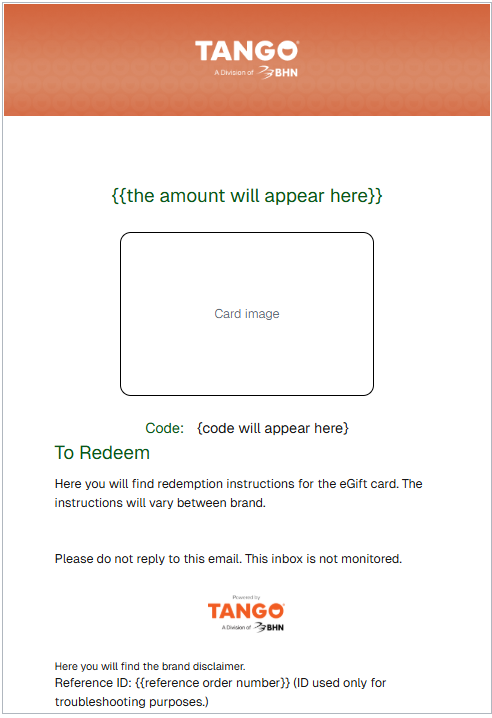
Email templates allow you to create branded reward emails for recipients. You can personalize emails with dynamic tags and control who can use the template. You can define the template name, sender details, access permissions, design and visuals. A live preview shows how the email will appear as you build it. Once created, templates can be used for individual or bulk orders, set as defaults, and adjusted before sending.
Note:
This section covers the Setup and Email steps. The Setup page defines settings shared across the entire digital template — including both email and text delivery — such as the template name, sender name, and access permissions. These are not email-specific, which is why Setup comes first.
To create an email template:
-
Sign in to the Tango portal.
-
Click Templates on the left menu.
-
Select Digital delivery from the drop-down menu.
-
Click Create digital template at the top right to open the Setup page.
-
In the Setup page, enter or select the following fields:
|
Field
|
Purpose
|
Required / Optional
|
|---|
|
Template name
|
Enter a descriptive name for your template to easily identify it later.
|
Required
|
|
Email sender name/from name
|
Enter the name that appears as the sender in the recipient's inbox. This value also populates any {{from_name}} tags in your template. You can edit it at the time of order.
|
Required
|
|
Set who can use this template
|
Choose which users can access this template: select Entire organization or Select accounts to restrict access.
|
Required
|
|
Set this template as a default
|
You can set a template as the default for your entire Tango platform or for specific accounts and groups. Once a template is selected as the default, all rewards will use it automatically. However, default templates can still be edited at the time of sending rewards.
Note:
When placing an order, the system automatically applies the default template based on the following priority: account-level (applied first), group-level (used if no account-level default is set), and platform-level (applied only if neither account nor group defaults are set).
|
Optional
|
-
Click Next to configure the message and design:
|
Field
|
Purpose
|
Required / Optional
|
|---|
|
Email subject
|
Write a subject line of up to 100 characters. Avoid words like "free" or "offer" and symbols like "!" or "$," which may trigger spam filters. You can also insert a dynamic tag. See how to Use dynamic tags in digital templates.
|
Required
|
|
Email message body
|
Write your main message in the “Email message body” field. You can also insert dynamic tags to personalize the message (e.g., recipient name, reward amount). You can override the Email message body for any template when you send rewards in Tango by selecting to edit the template per line item. The Message body can be a maximum of 3,000 characters.
See Send personalized messages with rewards to learn more about different ways to customize the message sent with a reward email for individual and multiple rewards.
|
Required
|
|
Email closing
|
Include a signature or closing statement in this field. It could be your name, company name, or a thank-you note. You can enter a hard-coded text, a dynamic tag, or a combination of the two. See Use dynamic tags in digital templates.
|
Optional
|
| Email recipient Support Message |
Select the check box labeled Include Tango’s recipient support information if you want Tango’s help details to be added to the email footer. By default, we’ve provided a link to the Tango support center. If you'd like to include your own customer support information, clear the checkbox. If you choose not to use Tango’s customer support, you’re taking responsibility for providing first-tier support to your recipients.
Note: We highly recommend select the Email recipient Support Message checkbox.
|
Optional
|
|
Email accent color
|
Choose a color that matches your brand or campaign theme. The color must be in a hexadecimal code or selected using the color picker in the template builder.
|
Optional
|
|
Email image alt text
|
Enter descriptive text for the header image to improve accessibility and display fallback text if the image doesn’t load. The alt text can be your company name, or the text that is on your custom header.
|
Required when header is used
|
|
Add email header image
|
Upload a branded image to appear at the top of your email. The image must be 650 x 150 pixels in PNG or JPEG format. Email images that have different dimensions may appear distorted.
Note: If no image is uploaded, the standard Tango logo appears.
|
Optional
|
-
Review the Email preview:
-
Click Create new template to save. It takes you to the newly created template on the Templates list.
Note:
-
By default, all digital templates are available to users with permission to place orders, regardless of platform level. Setting access levels is optional but allows for more control.
-
If a digital template is assigned to a specific access level, such as an account, only users with access permissions to that account will be able to use the template.
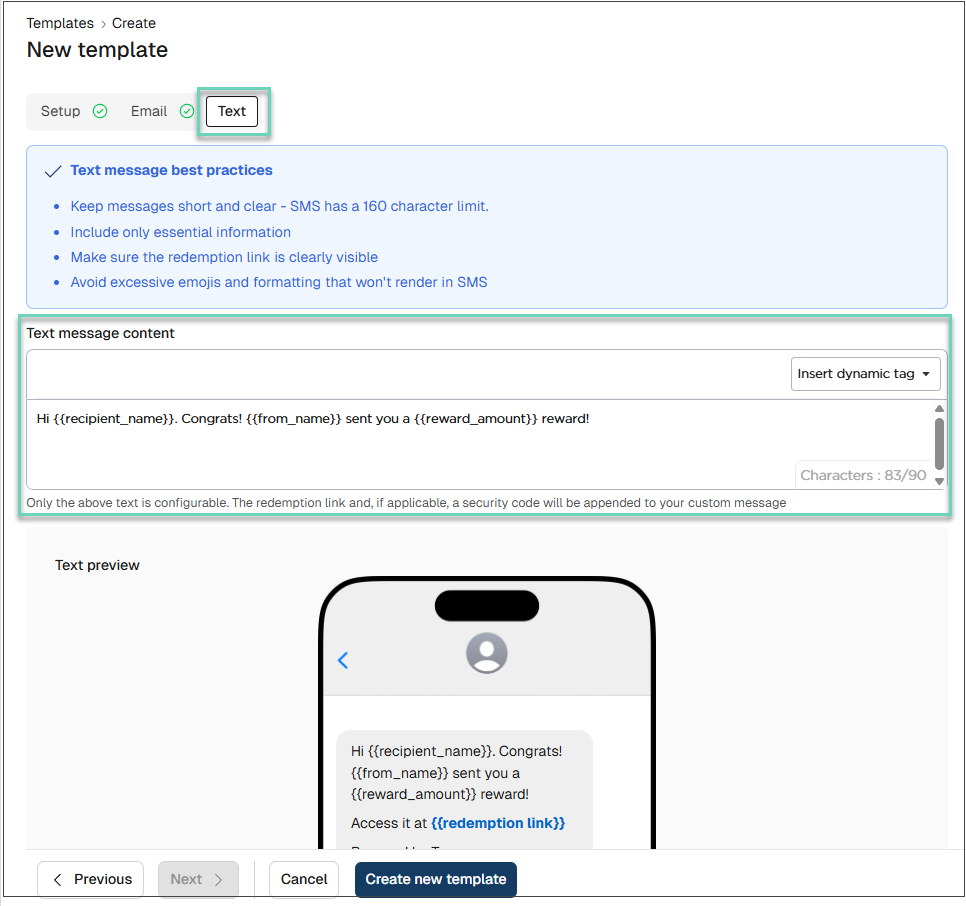
Create a Text template
Text templates allow you to create concise SMS messages for digital rewards. After completing the Setup and Email steps, you can customize the Text message, which is limited to 90 characters. Your message will automatically include a redemption link and, if applicable, a security code. Once finalized, the template can be saved and used for sending digital deliveries.
Note:
The Text message is not a standalone template—it is part of the same digital template that includes the email layout. Since a digital template is a single entity (with one ETID), the Setup and Email pages must be completed first because they define shared settings (template name, access permissions, sender details) and the email layout that are part of this same template. The Text page is the final step in configuring the complete digital template.
To create a text template:
-
Sign in to the Tango portal.
-
Click Templates on the left menu.
-
Select Digital delivery from the drop-down menu.
-
Click Create digital template on the top right.
-
Complete the Setup and Email pages first by following the steps above. The portal requires these before you can proceed to the Text page.
-
Go to the Text page.
-
In the Text message content field, customize the pre-filled message. The maximum length is 90 characters.
-
Click Create new templates.
Access templates
You can set a custom digital template as the default for your entire platform, a specific group, or an individual account. You can also restrict a template's visibility to users of a particular group or account. The default email template will automatically apply to all rewards in your order. If you’d like to personalize a message, you can easily edit the template before sending. See Send personalized messages with rewards.
For example, if the Finance digital template is shared with both the Finance and Sales accounts, it will be accessible to users in the Finance and Sales accounts, users in groups that include either account, and users with organization-wide access.
If the template is set to Specific Access, users who don’t have access to the Finance or Sales accounts—or to a group that includes those accounts, or to the entire platform—won’t be able to use the Finance digital template.
Note:
-
A newly created custom template will not replace the standard template unless the user sets it as the “default” for the platform, group, or account. Users can also create a template without designating it as the default.
-
Depending on your permissions, you can edit a default or a custom template originally created for a specific account or group and make it accessible at other levels. For example, a platform-level default template can also be used for account-level rewards, and so on.
-
When placing an order, if you switch the account from which the order is being made, and that account has a different default template set, the system will display a confirmation notice to inform you of the change.
Manage digital templates
For more on managing and customizing templates:
More resources

