By integrating Tango with HubSpot, you can send recipients their choice of digital gift cards, prepaid cards, and payouts directly from your HubSpot account. Tango for HubSpot allows you to automate the process using your existing HubSpot workflows and send personalized rewards and incentives to your contacts.
To install Tango for HubSpot and begin sending rewards to your recipients, follow the two-step instructions below:
- Connect to HubSpot
- Create a record object
Note:
We only support email-based reward delivery with this integration.
Audience
This guide is intended for:
- Tango users who are interested in integrating with HubSpot.
- HubSpot users who already have their own HubSpot workflows but are interested in integrating with Tango.
Prerequisites
To install the Tango app in HubSpot, you must have:
- A HubSpot account with Enterprise subscription—see how to sign in to your existing account.
- Tango platform with API access enabled—sign up for a free Tango account if you don’t have one.
- Tango API Key access—see Manage Basic Auth API keys in Tango, or contact your Customer Success Manager (CSM) or success@tangocard.com, if it’s not already turned on for your account.
- Tango admin permissions and access to API keys under integration.
- A pre-funded account in Tango—see Ways to pay for your Tango orders.
Required permissions
You must have Manage permissions under Integrations for Tango API keys to be able to access Tango’s Integrations page.
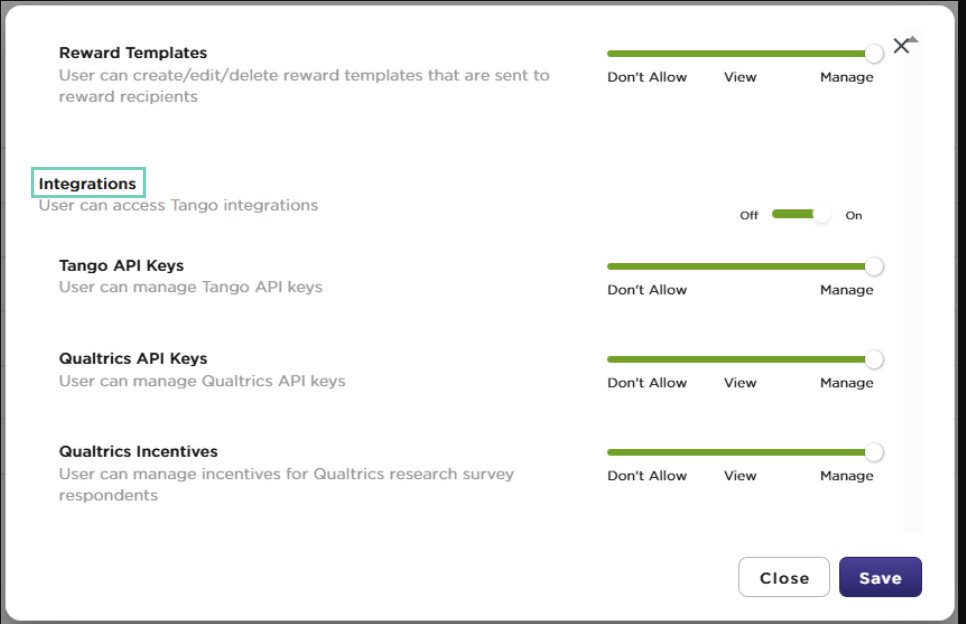
Learn how to Manage custom user roles in Tango.
Step 1: Connect to HubSpot
To manage your HubSpot third-party application in Tango portal, you must have a HubSpot account and HubSpot admin privileges.
To connect to HubSpot:
-
Sign in to the Tango portal.
- Click Integrations from the left menu.
- Locate or search for HubSpot integration app.
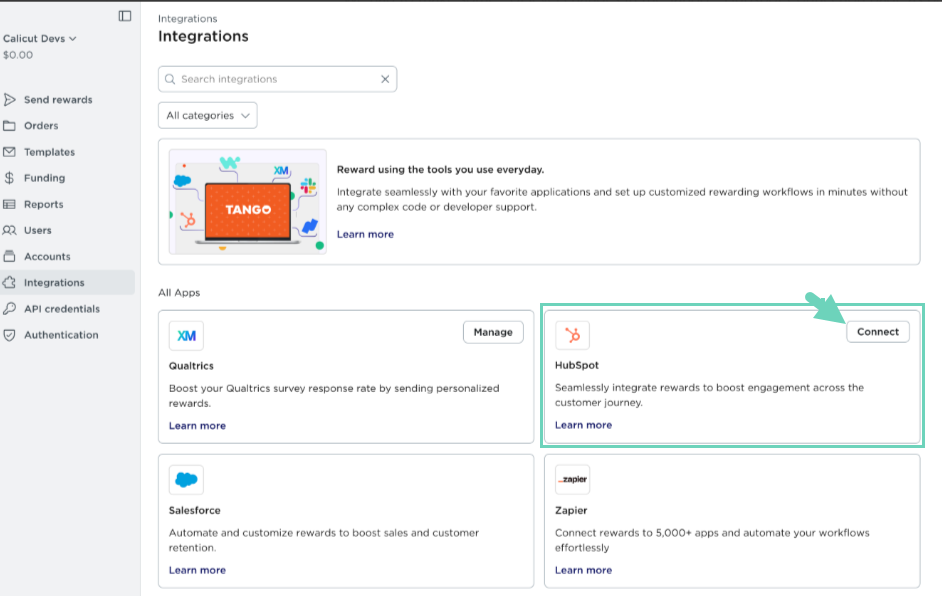
-
Click Connect.
- Click Initiate Setup. The process may take up to 1-2 minutes. You can safely leave this page and return later to complete the next steps. We'll save your progress automatically.
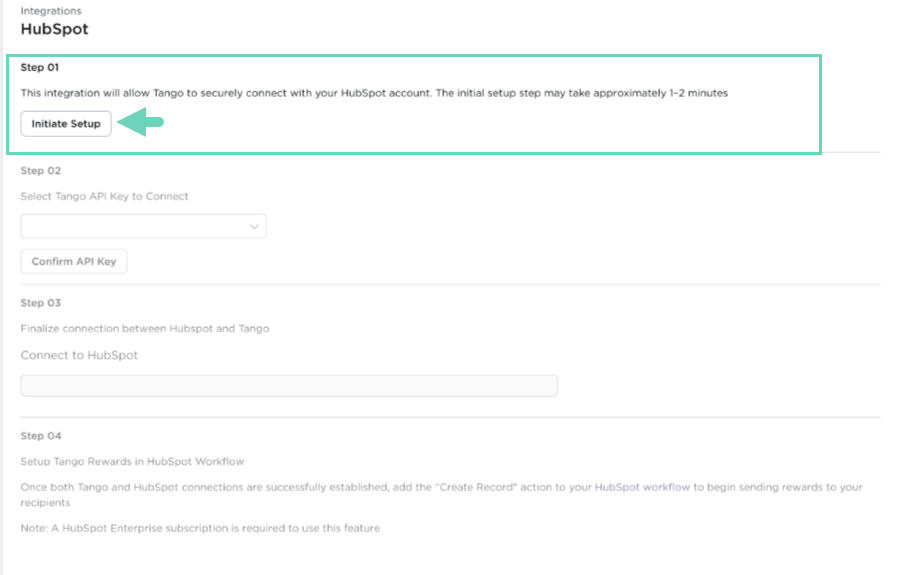
- Select the relevant Tango API key and click Confirm API Key. If you have not created an API key before, see Manage Basic Auth API keys in Tango.
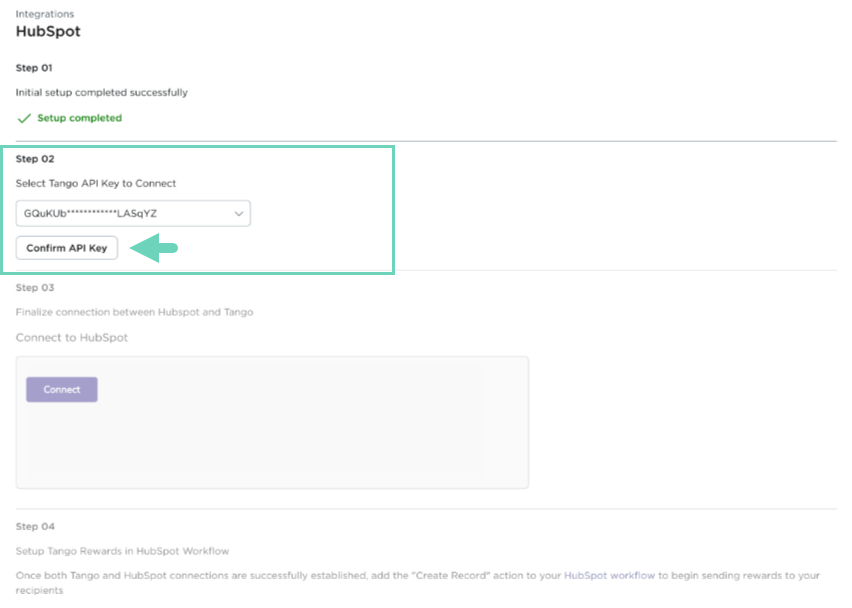
- Once the Tango API is connected, click “Connect” under the HubSpot section. It opens the Connecting Tango to HubSpot page.
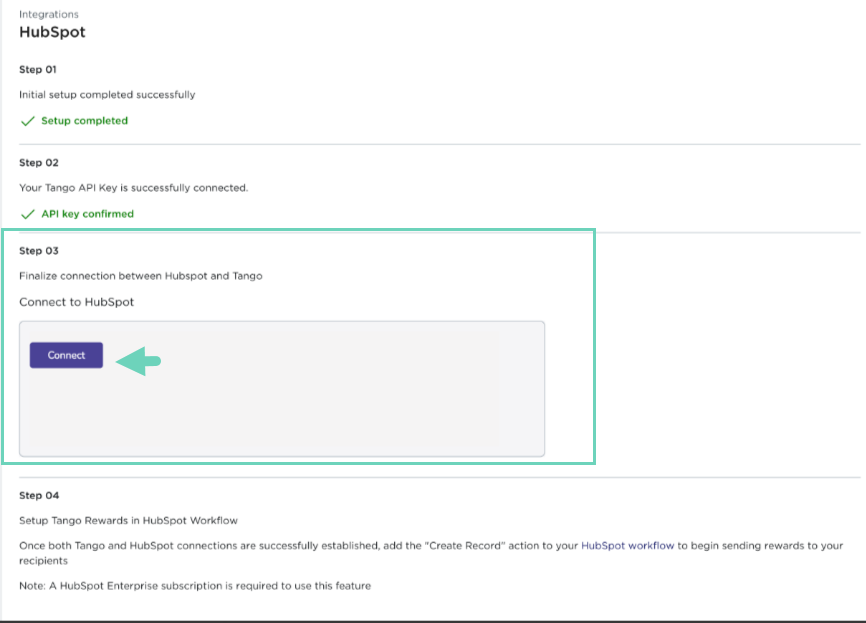
- In the HubSpot app, select your HubSpot account, then click Choose Account. If you have not logged in already, you will be prompted with a new window to log in to your HubSpot account.
- Click Connect app to confirm.
Tango is requesting access to HubSpot. A green message in the Tango portal’s Integration page indicates you’ve been connected successfully.
You have established the connection to Tango and are now ready to create a workflow. To open more information click Learn More. Find your Tango platform name and API key by navigating to Integrations > API credentials > API keys. See Manage Basic Auth API keys in Tango.
Step 2: Create a record object
Now that the connection is created, you simply need to add the Create record object to a workflow in order to send rewards from a HubSpot workflow to your recipients. Follow HubSpot help center to learn how you can set up and Create workflows and define triggers for your rewards. To learn more about Tango Group and Account, ETID, and UTID, check out our Tango help center.
Before you start, collect the following information from the Tango portal:
- ETID (default Email Template ID is E000000) If you create a custom email template your platform will have additional ETIDs to choose from. See how you can create a custom email template.
- Group Identifier
- Account Identifier
- UTID (a Unique reward Identifier. See What is a UTID?.)
To Create a record object:
- Log in to your HubSpot account.
- Go to Automation > Workflows.
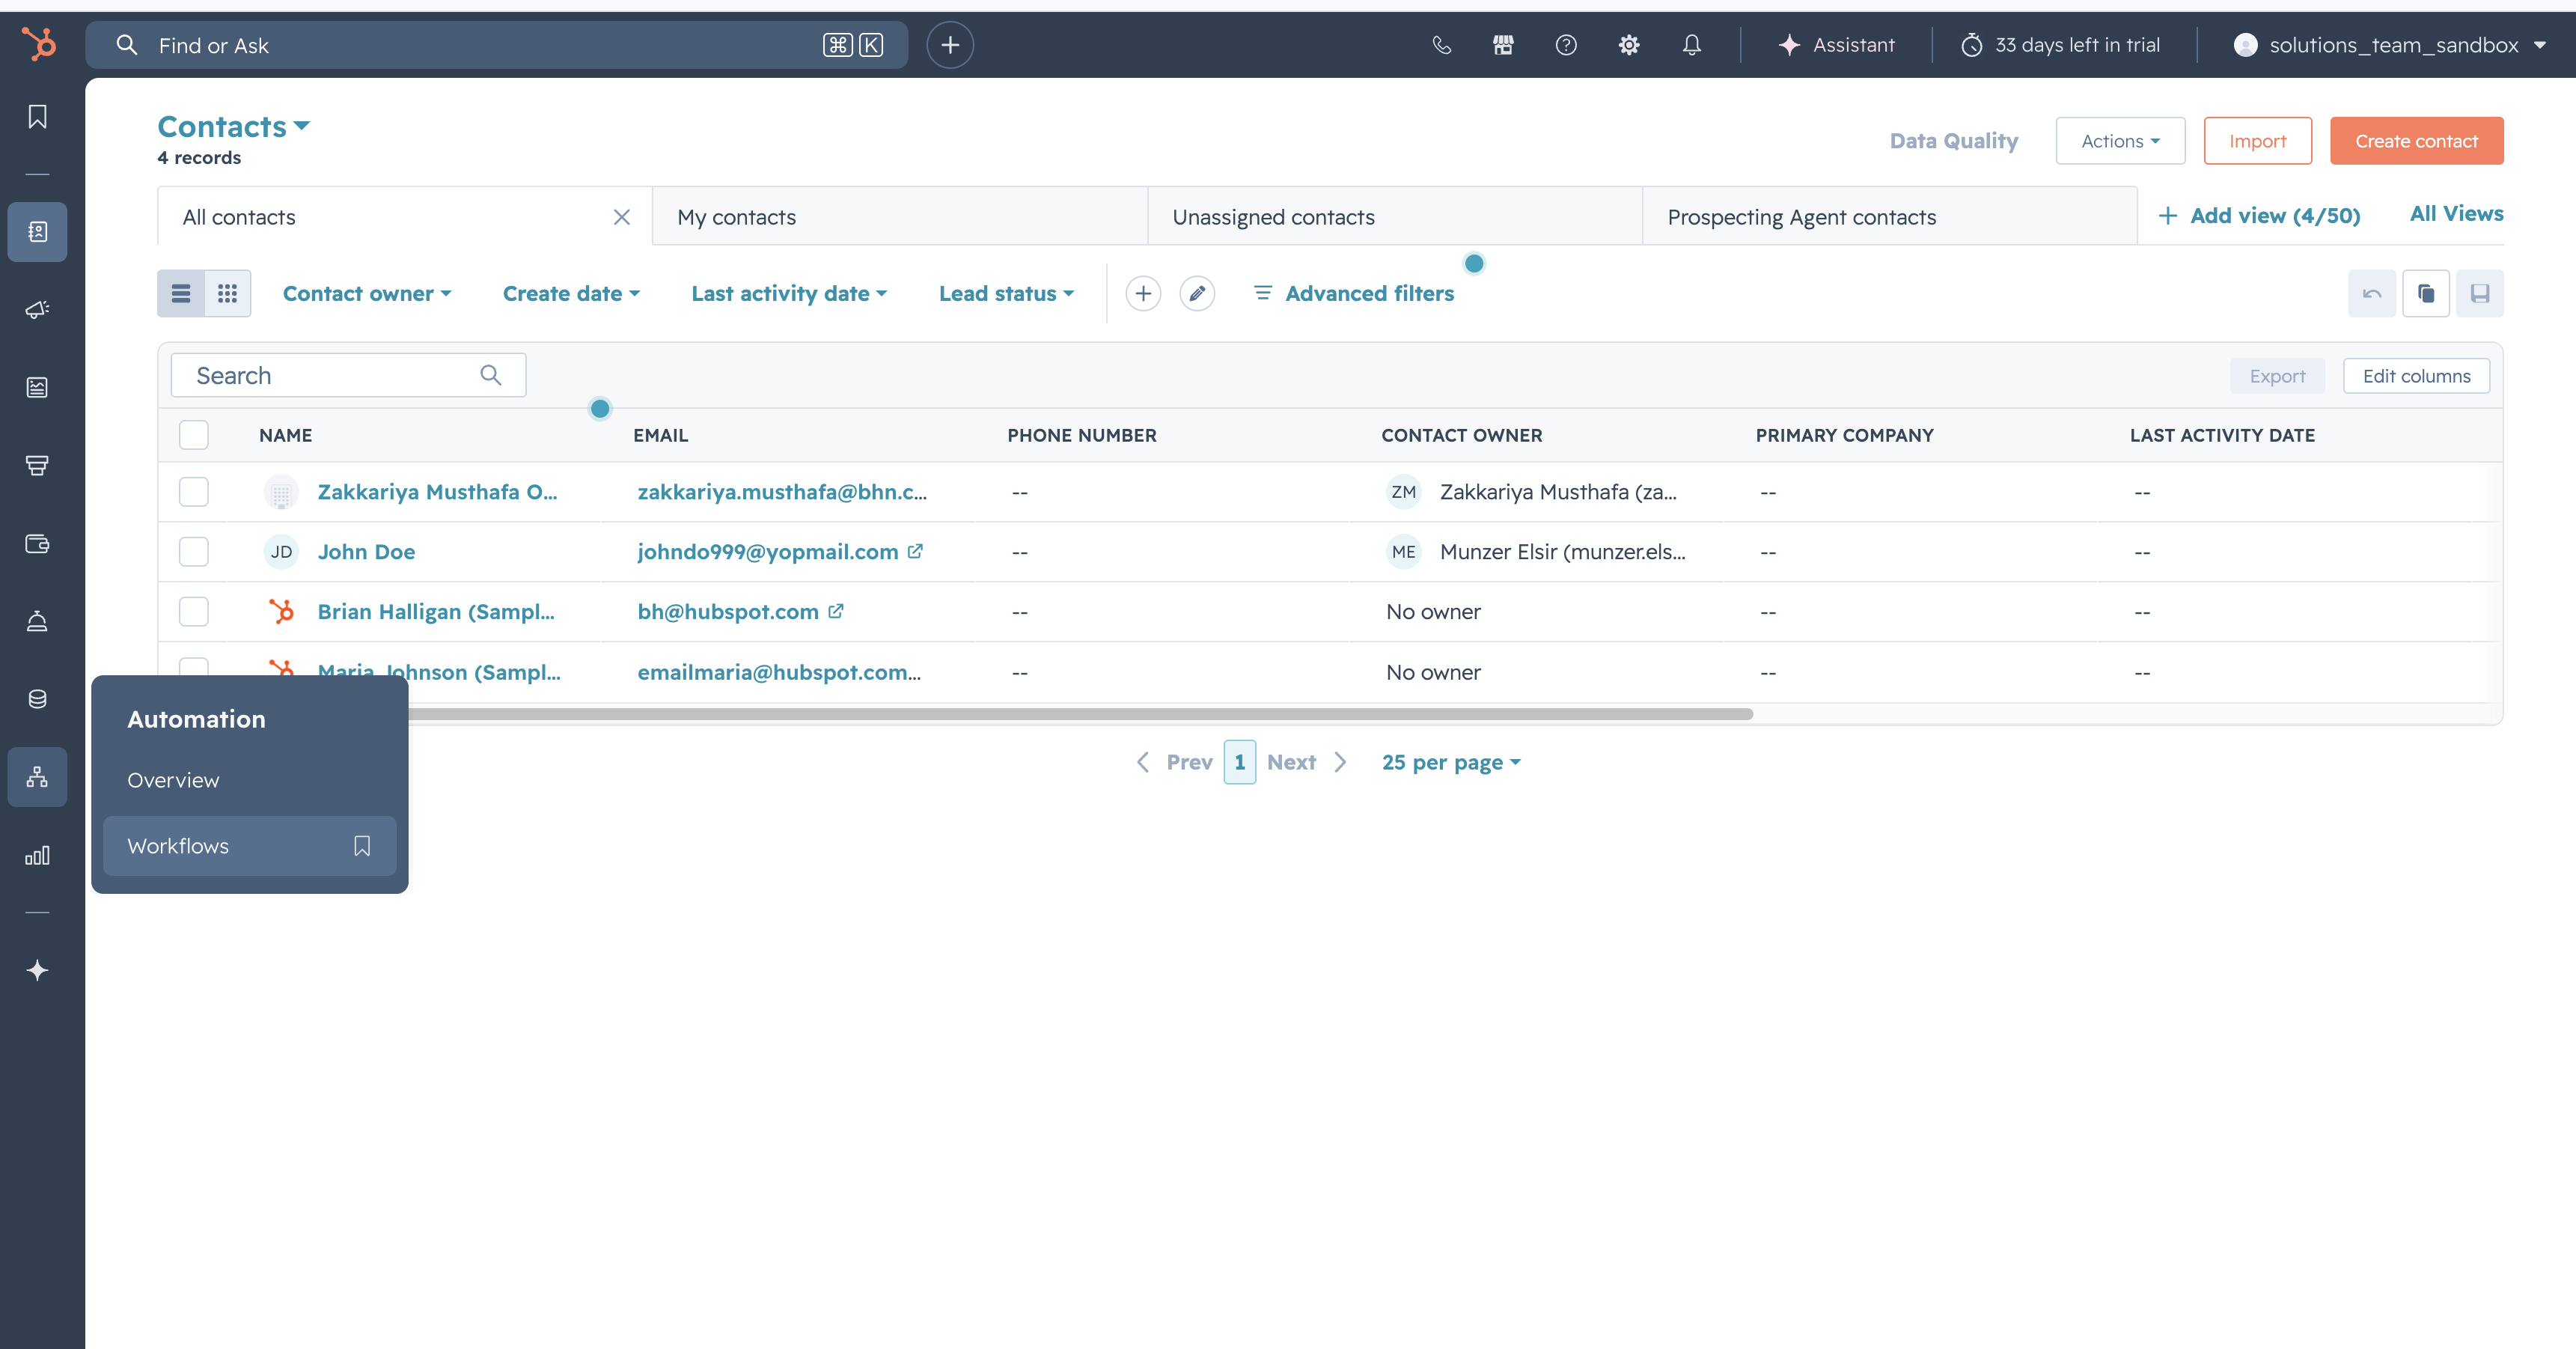
- Click Create workflow > From scratch on top right to create a new workflow.
See the HubSpot help center to learn how to Create workflows. - Click
 inside the workflow to open the Choose an action menu.
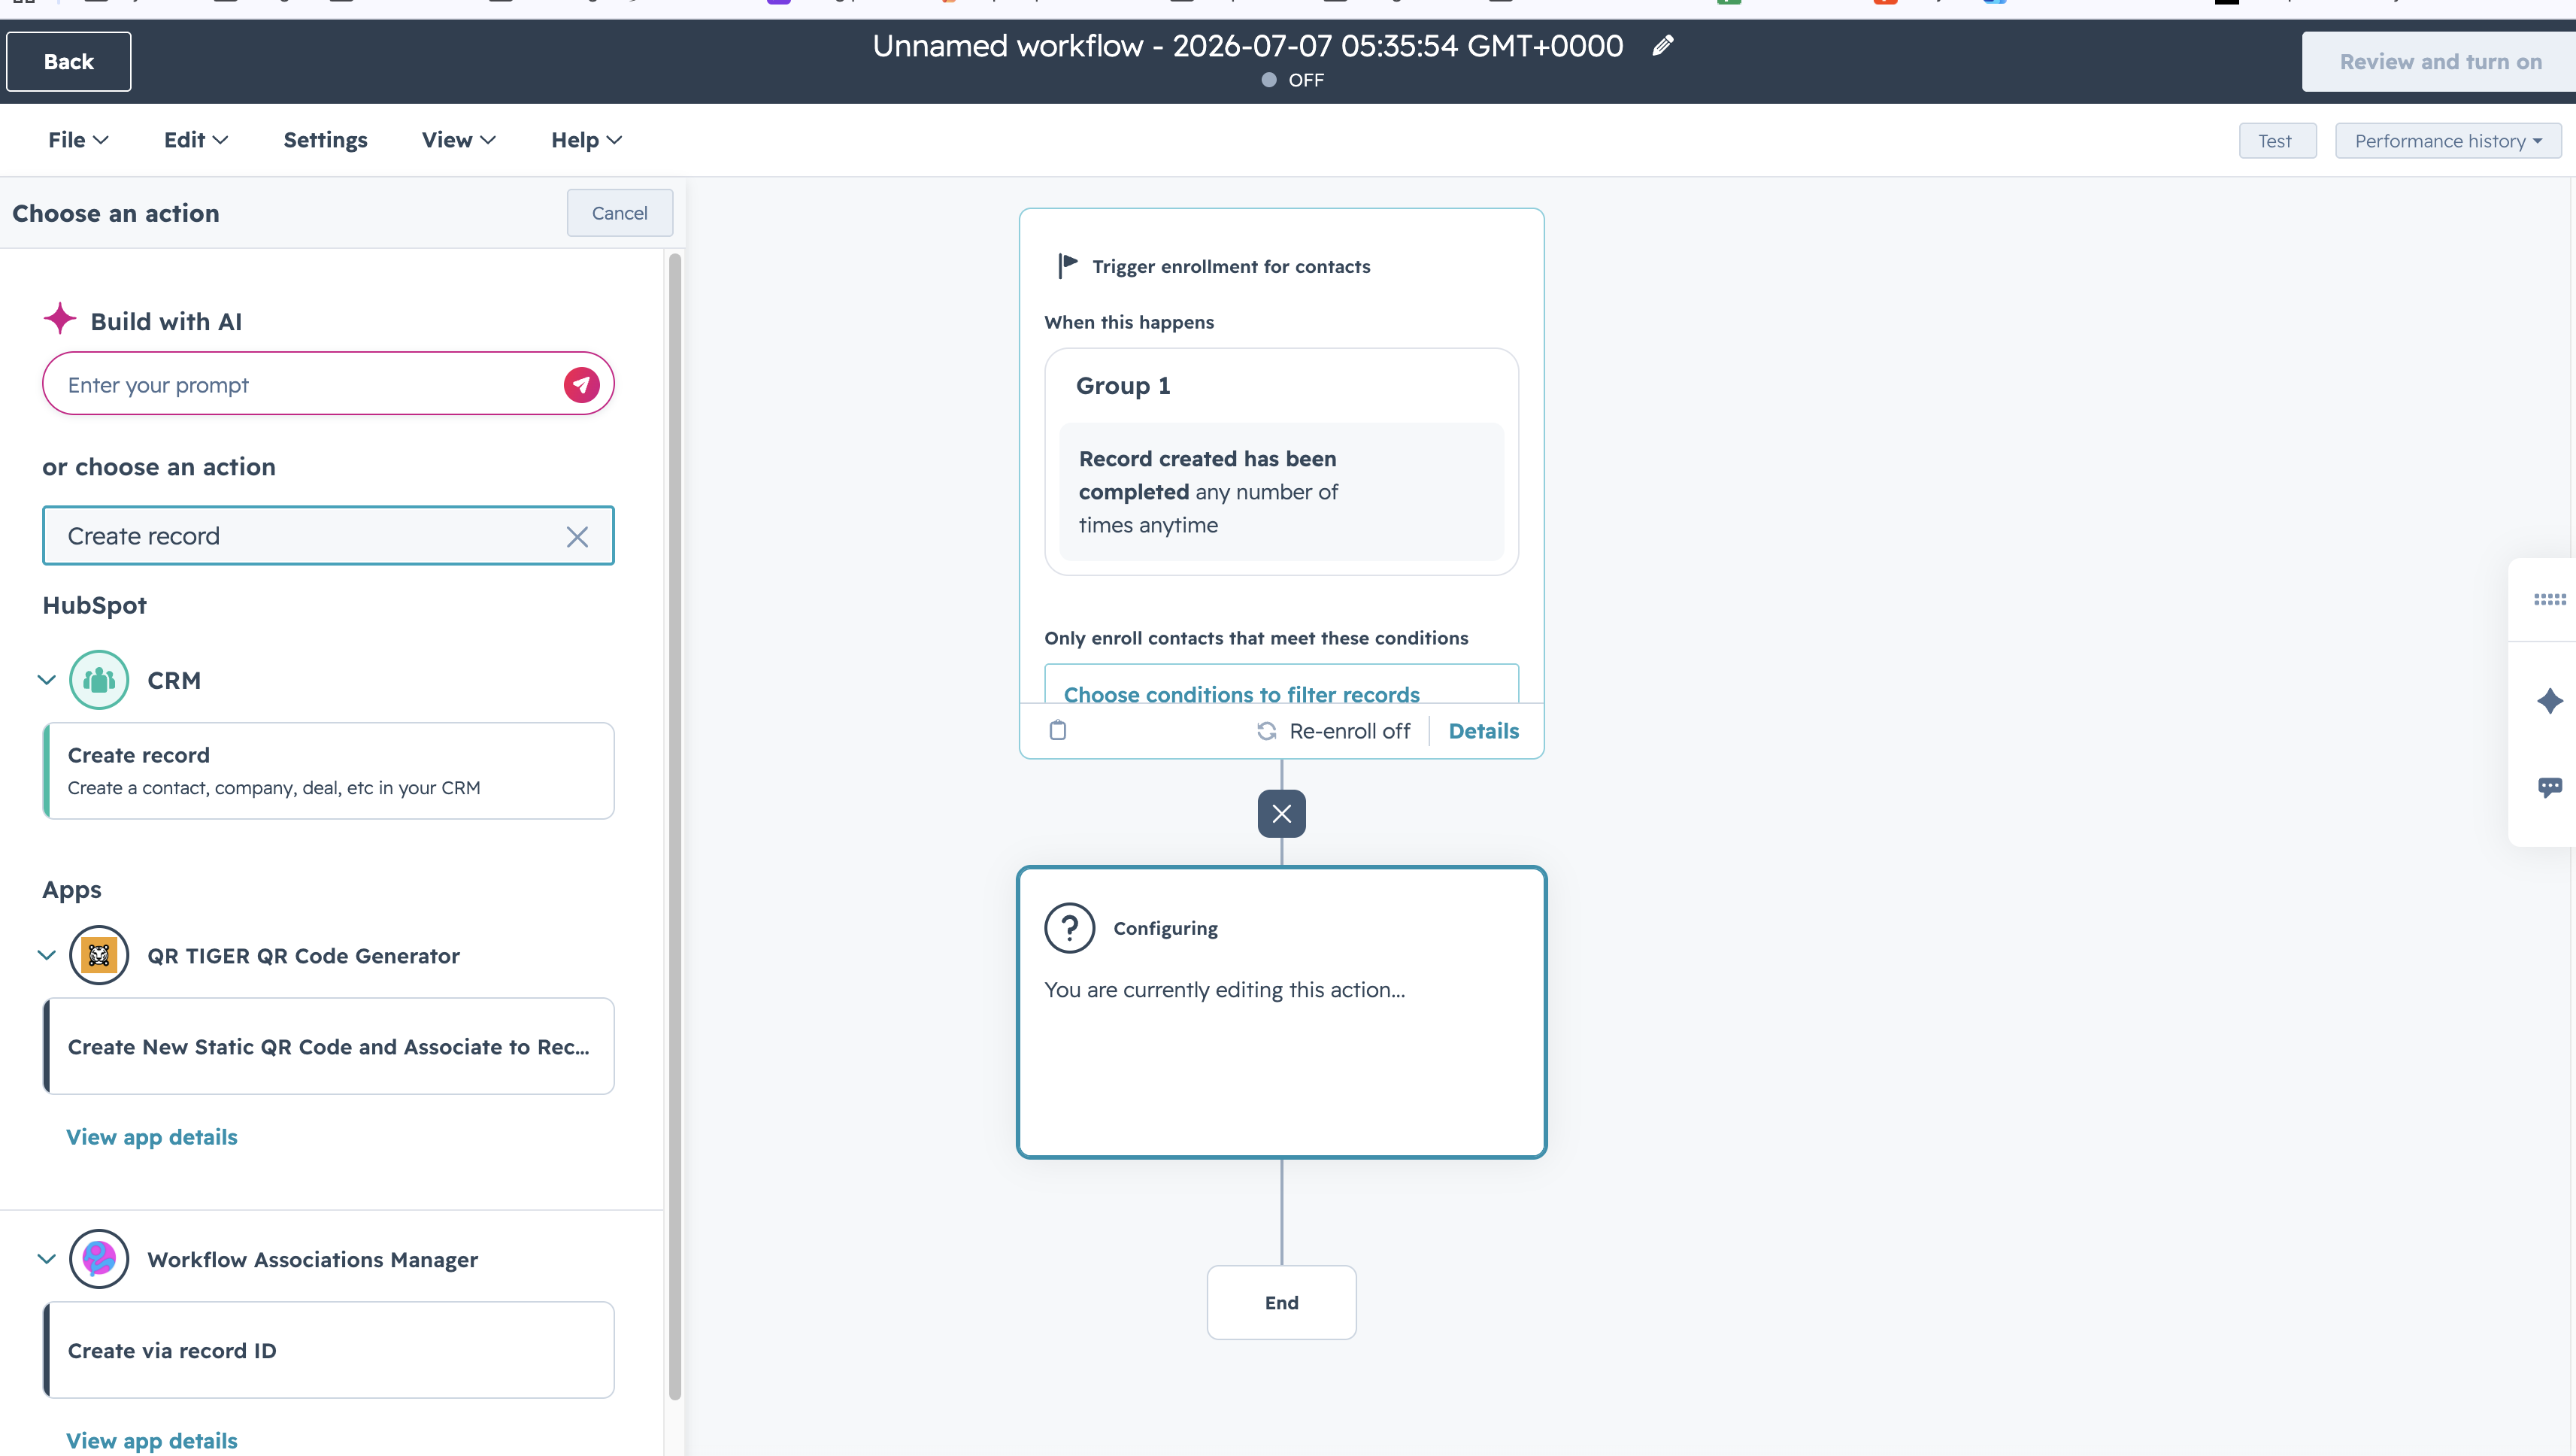
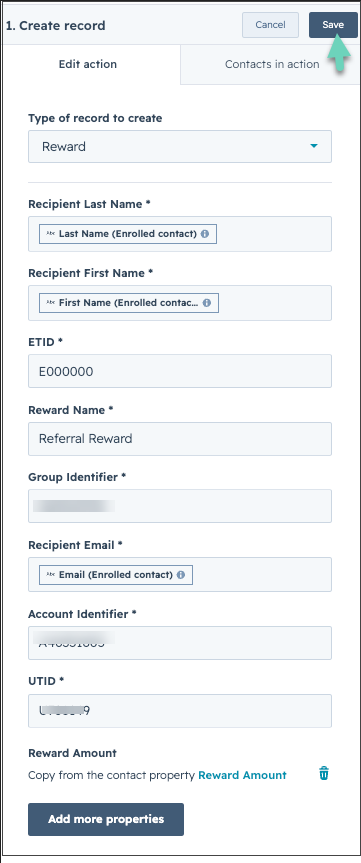
- In the search field type Create record and select it. Create record allows you to create a contact, company, deal, etc. in your CRM.
- Select Reward for Type of record to create.
- Enter the field values based on the table below:The following image illustrates the required fields under Create record in HubSpot:
|
Fields in HubSpot
|
Description
|
|---|
| Recipient Last Name | Select last name in the HubSpot contact property from the Available data menu to the right. |
| Recipient First Name | Select first name in the HubSpot contact property from the Available data menu to the right. |
| Recipient Email | Select email in the HubSpot contact property from the Available data menu to the right. |
|
From Tango portal
|
|---|
| ETID | Copy your Email Template ID that you want to use for this campaign from inside your Tango platform. See where the email template is located. See more about ETIDs here. |
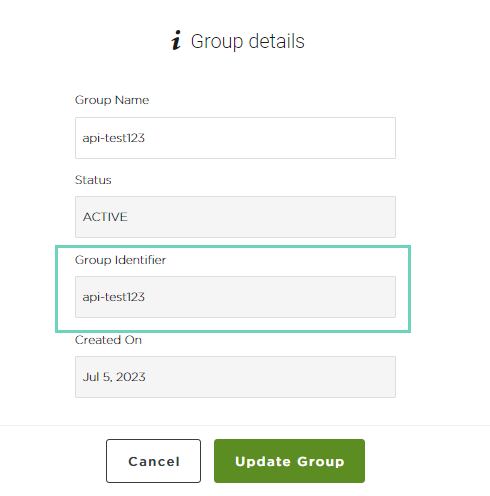
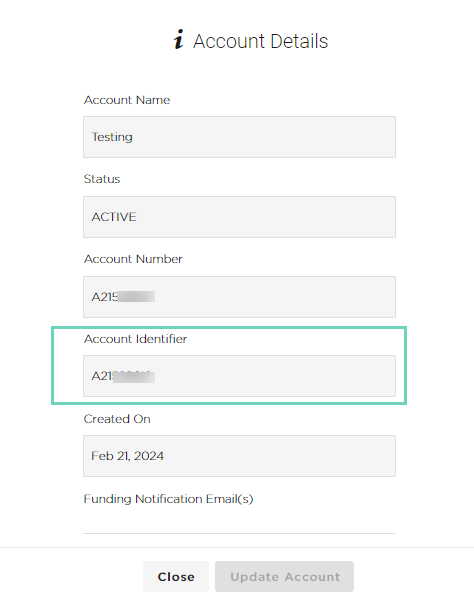
| Group Identifier | Copy the Group Identifier from inside your Tango platform by going to Accounts > Group details. The Group Identifier is associate with the account you want to use for this campaign.
 |
| Account Identifier | Copy the Account Identifier from inside your Tango platform by going to Accounts > Account Details. Account Identifier is associated with the account you want to use for this campaign. See Find your Tango account number.
 |
|
| UTID | Copy your unique Tango ID from inside your Tango platform. Go to Send rewards and select the reward you want to use in this campaign then click the link View all reward details. See What is a UTID? |
| Reward Amount | Enter the value of the reward you wish to send. Currency will match the UTID or reward selected.
- Entering “10” translates to a $10 USD reward when selecting a US-based reward, and “1200” translates to a ₹1200 INR reward when selecting an India-based reward.
- Make sure the amount you select is compatible with the minimum and maximum values of the reward you are sending.
|
| Reward Name | Reward name is found in the field is for your internal use and reporting only. |
|
The following image illustrates the required fields under Create record in HubSpot:
- Select the check box Add timeline activity from the enrolled contact to the reward starting from, and then select the appropriate time period if you want the Reward to appear in the Contacts activity timeline.
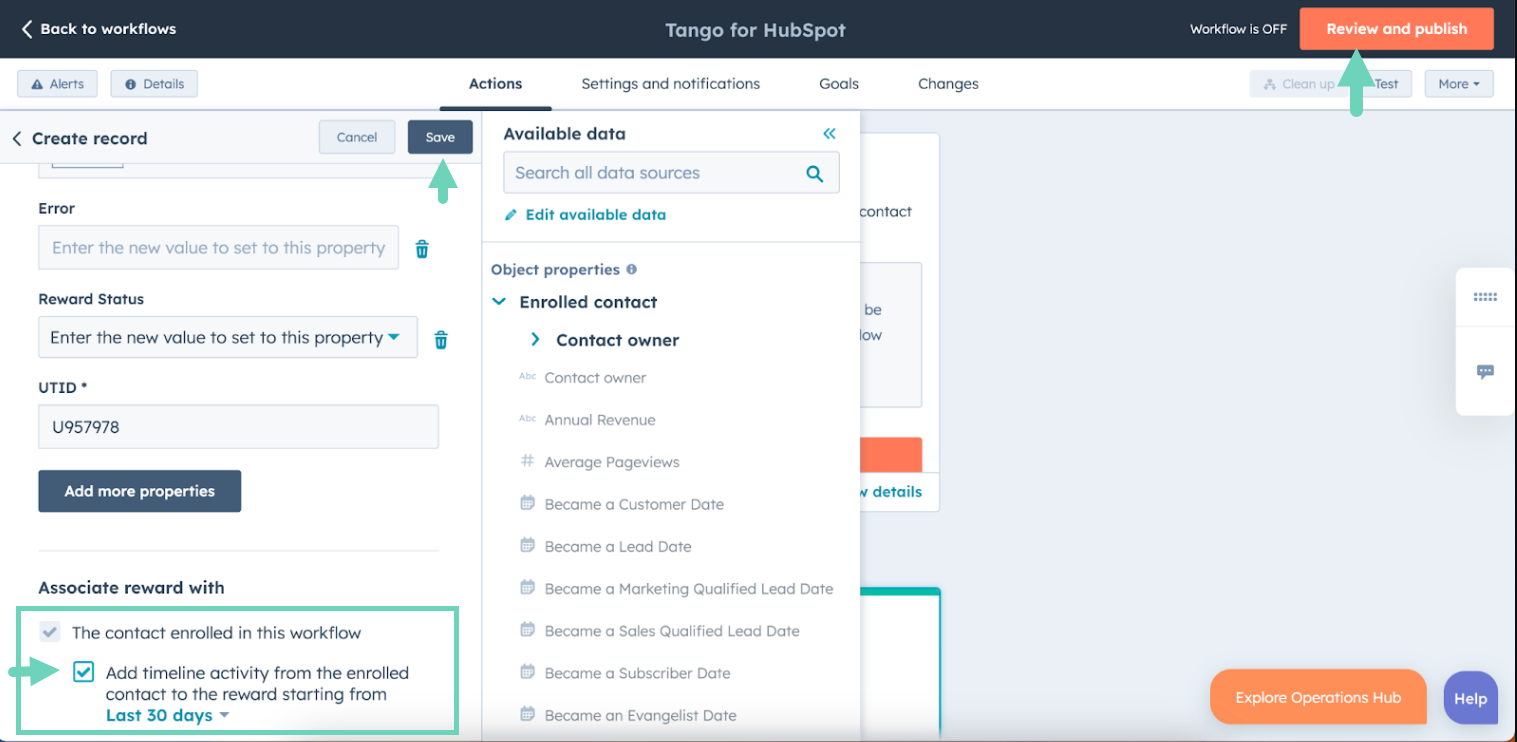
- Click Save.
- Click Review and Publish on top right.
- Click Turn On. Your workflow is up and running. You are now set to send rewards with the creation of this workflow. See HubSpot instructions on how to Create workflows.
Set up error email notification
We recommend setting up a workflow that generates an email notification whenever there is an error sending a reward. For more help, contact HubSpot support.
To set up error email notification in your workflow:
- Log in to your HubSpot account.
- Navigate to Workflows > Create workflow > From scratch.
- Choose Reward-based on the left.
- Select Blank workflow then click Next on top right.
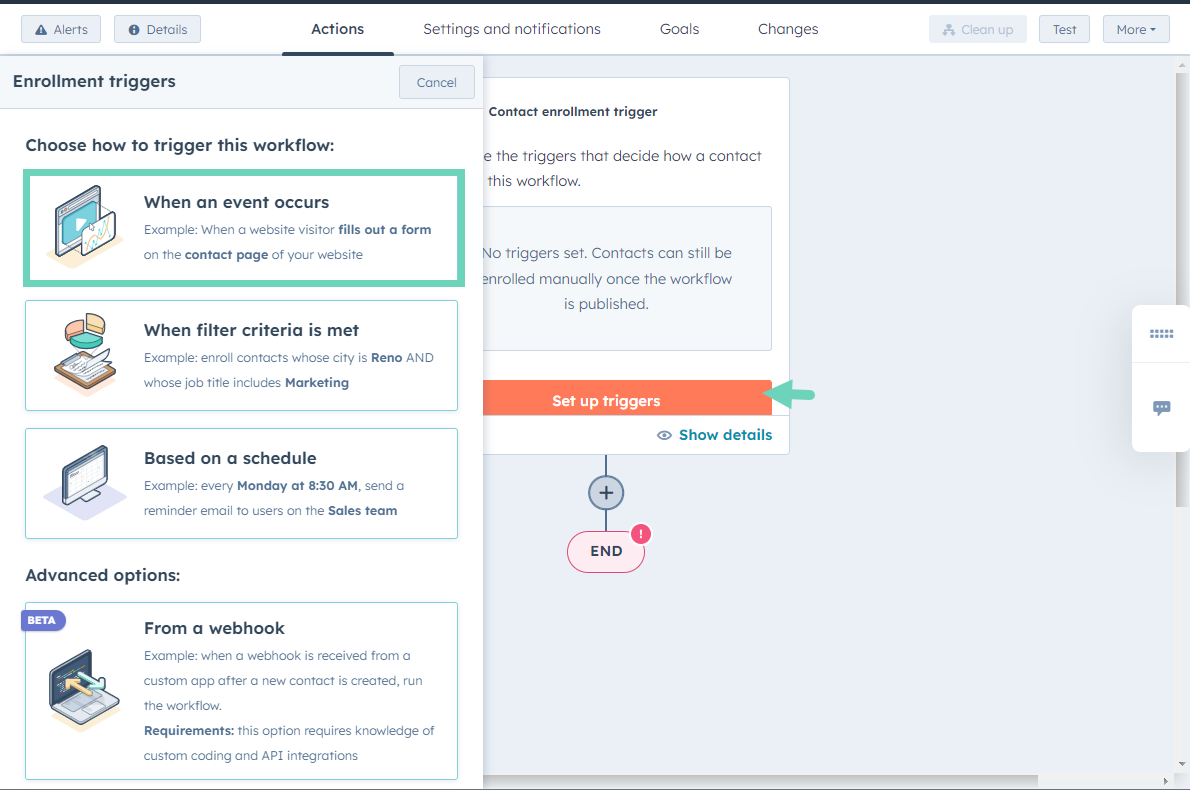
- To set up triggers in your automation:
- Click Set up triggers > When an event occurs.
- In Add trigger box, search for and click the Property value changed link.
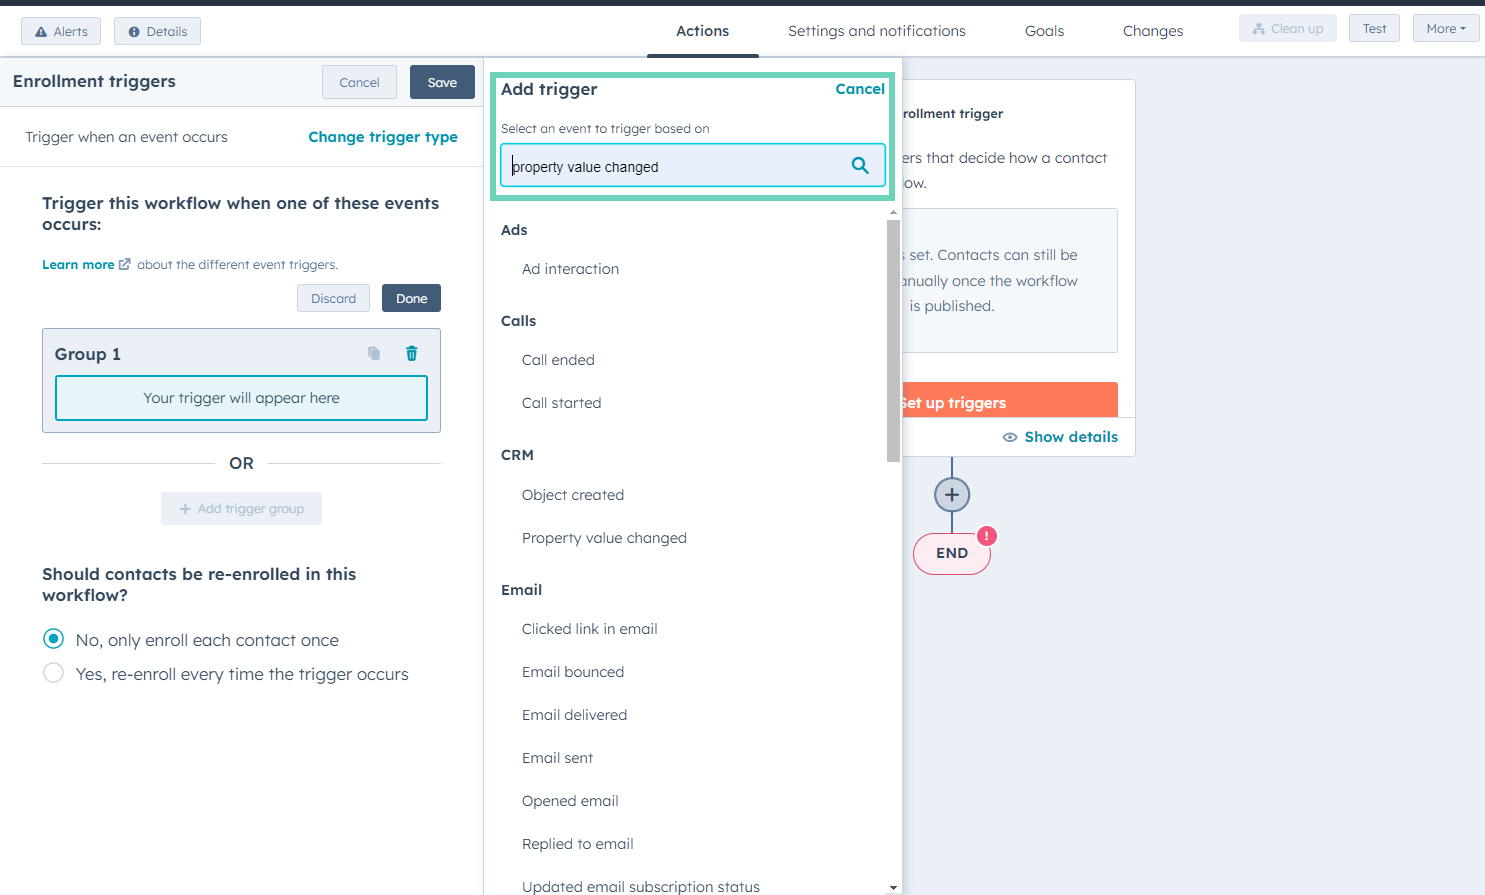
- In Edit trigger box, choose Error under Property name.
- In Edit trigger box, choose is known under New value Error.
- Click Done.
- To set up an action:
- Click inside the workflow to open the Choose an action menu.
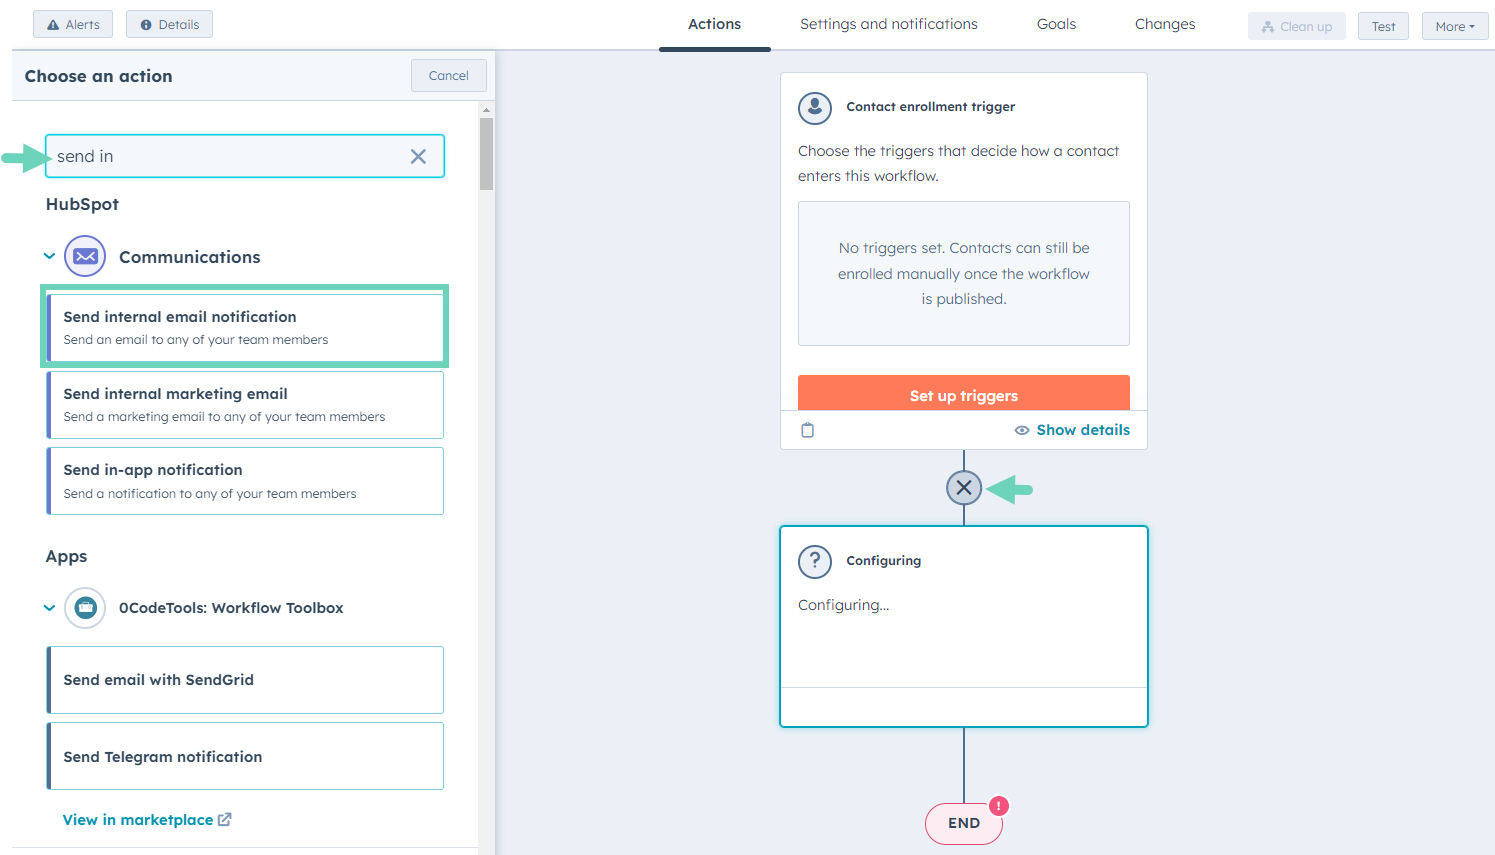
- Search for Send internal email notification, then click to open.
- In the email notification:
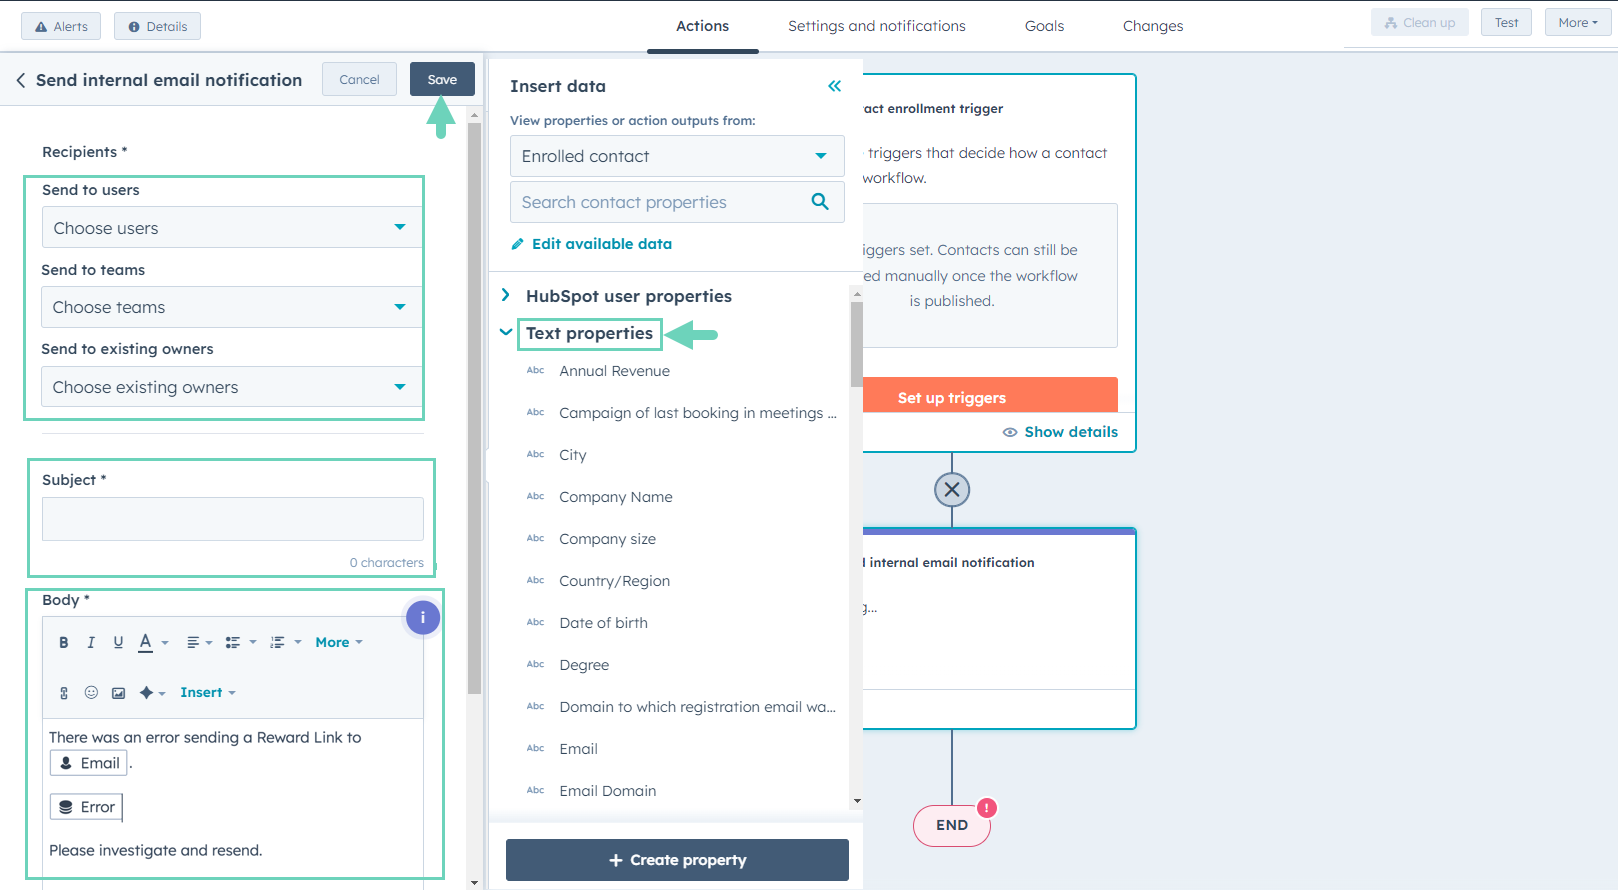
- Under Recipients, select your email and other relevant stakeholders at your organization.
- Enter a Subject line such as “Reward sending error”.
- Type a message for the Body of email notification.
- Click to add Text properties such as Email and Error from the drop-down list.
- Click Save to save all your changes.
More resources:

